Welcome to the world of blockchain technology, where the concept of decentralization has revolutionized the way we engage with digital assets. As a Galxe user, you understand the importance of having a secure and reliable EVM wallet to manage your cryptocurrencies. But what if you want to add a secondary EVM wallet to your Galxe account?
In this comprehensive guide, we will walk you through the step-by-step process of adding a secondary EVM wallet to your Galxe account. Whether you want to diversify your investments or simply enhance your financial security, having multiple wallets can be a wise move in the ever-evolving crypto landscape.
Before we dive into the details, it's essential to understand the benefits of adding a secondary EVM wallet. Firstly, it provides an additional layer of security. By separating your assets into different wallets, you reduce the risk of a single point of failure. Secondly, having multiple wallets allows for better organization and management of your digital assets. It gives you greater control over your portfolio and simplifies tracking your transactions.
Now, let's get started with the step-by-step process of adding a secondary EVM wallet to your Galxe account. By following this guide, you'll be able to navigate the process with ease and ensure that your digital assets are secure and accessible.
If you want to add a secondary EVM wallet to your Galxe ID, follow these simple steps:
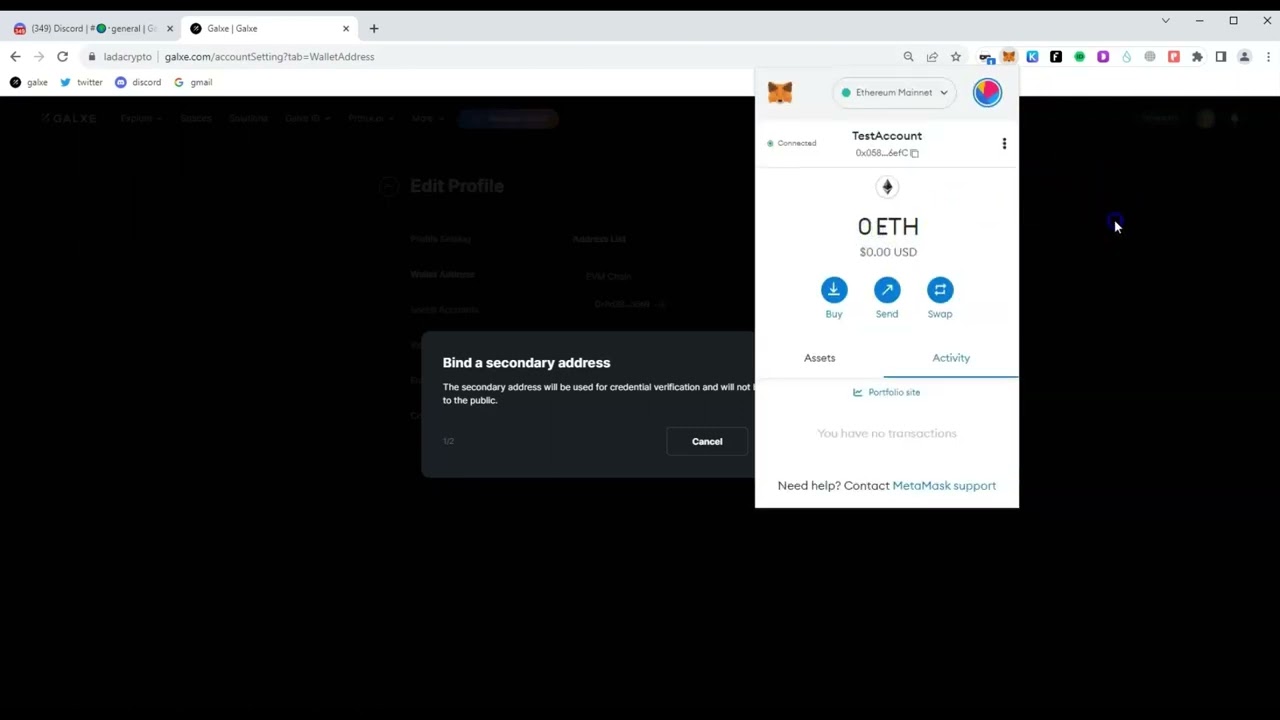
First, open the Galxe ID panel by clicking on the Galxe ID icon in your browser toolbar.
Once the Galxe ID panel is open, navigate to the "Wallets" section by clicking on the "Wallets" tab located on the left-hand side.
In the "Wallets" section, click on the "Add Wallet" button to start the process of adding a secondary EVM wallet.
After clicking on "Add Wallet", you will see a list of EVM compatible wallets. Choose the EVM wallet you want to add as your secondary wallet from this list.
Once you have selected your EVM wallet, click on the "Connect" button to connect your chosen wallet to your Galxe ID.
Follow the instructions provided by your chosen EVM wallet to complete the connection process. This may involve confirming the connection on your wallet's interface or entering your wallet password.
Once the connection process is complete, your secondary EVM wallet will be added to your Galxe ID. To verify the wallet, you may need to sign a message or complete a verification process.
Congratulations! You have successfully added a secondary EVM wallet to your Galxe ID. You can now use this wallet for EVM-based activities and transactions within the Galxe ecosystem.
In order to add a secondary EVM wallet to your Galxe ID, you first need to create a Galxe ID. Galxe ID is a decentralized identity system where you can manage your digital assets and interact with different blockchain networks. To create a Galxe ID, follow these steps:
Click on the "Create Account" button.
Choose a unique username for your Galxe ID.
Create a secure password for your Galxe ID.
Confirm your password.
Read and accept the terms and conditions.
Click on the "Create" button.
Once you have successfully created your Galxe ID, you can proceed to add a secondary EVM wallet to it.
An EVM (Ethereum Virtual Machine) wallet is a digital wallet that allows users to store, manage, and interact with their Ethereum-based assets. It is an essential tool for anyone looking to engage with the Ethereum ecosystem and participate in decentralized finance (DeFi) applications, token sales, and smart contract interactions.
EVM wallets are typically web-based or mobile applications that connect to the Ethereum network and securely store users' private keys, which are required to access and control their Ethereum assets. These wallets allow users to send, receive, and store cryptocurrencies like Ether (ETH) and ERC-20 tokens.
Some popular EVM wallets include MetaMask, MyEtherWallet, Trust Wallet, and WalletConnect. These wallets provide a user-friendly interface that simplifies the process of interacting with Ethereum-based services and applications.
When setting up an EVM wallet, users are typically provided with a unique wallet address, which serves as their public key. This address can be shared with others to receive funds or tokens. Additionally, users are required to create and securely store their private key or seed phrase, which is used to sign transactions and access their wallet.
It is important for users to understand the security implications of using EVM wallets. Private keys and seed phrases should never be shared with anyone and should be backed up and stored securely to prevent unauthorized access to funds. Additionally, users should exercise caution when interacting with unknown or suspicious applications or websites to avoid falling victim to scams or phishing attacks.
By understanding and using EVM wallets, users can fully participate in the decentralized economy and take advantage of the numerous opportunities and innovations offered by the Ethereum ecosystem.
When adding a secondary EVM (Ethereum Virtual Machine) wallet to your Galxe ID, you have several options to choose from. Here are some popular EVM wallets that you can consider:
MetaMask: MetaMask is a browser extension wallet that allows you to access Ethereum dApps (decentralized applications) and manage your ERC-20 tokens.
Trust Wallet: Trust Wallet is a mobile wallet that supports various blockchains, including Ethereum. It provides a user-friendly interface and supports decentralized exchanges.
MyEtherWallet: MyEtherWallet is a free, open-source wallet that allows you to generate and manage Ethereum wallets. It also enables you to interact with smart contracts.
Hardware Wallets: Hardware wallets, such as Ledger and Trezor, are physical devices that provide an extra layer of security for your EVM wallet. They store your private keys offline.
It's important to choose a secondary EVM wallet that suits your needs and preferences. Consider factors such as user interface, security features, and compatibility with other platforms or wallets you use.
Once you've chosen a secondary EVM wallet, you will need to connect it to your Galxe ID following the steps provided by the wallet provider. This may involve installing the wallet application, creating a new wallet, or importing an existing one.
Remember to always secure your EVM wallet with a strong password and enable any additional security measures offered by the wallet provider. Keeping your wallet and private keys safe is crucial for protecting your digital assets.
Before you can add a secondary EVM wallet to your Galxe ID, you need to install the wallet app on your device. Follow these steps to get started:
Visit the official website of the wallet app.
Click on the download button to get the app.
Once the download is complete, open the app installer.
Follow the on-screen instructions to install the app.
After the installation is finished, open the wallet app.
You will be prompted to create a new wallet or import an existing one.
Choose the option to create a new wallet if you don't have one already.
Set a secure password for your wallet and follow the steps to create it.
Once your wallet is created, you can proceed to add a secondary EVM wallet to your Galxe ID.
Make sure to keep your wallet password secure and easily accessible only by you. With the wallet app installed, you are ready to move on to the next steps of adding a secondary EVM wallet to your Galxe ID.
If you want to add a secondary EVM wallet to your Galxe ID, follow these steps:
The first step is to install a wallet application that supports the EVM. There are several options available, such as MetaMask, Trust Wallet, and MyEtherWallet. Choose the one that suits your needs and download it from the respective app store or website.
Open the wallet application and create a new wallet if you don't have one already. You may need to provide a password and backup phrase to secure your wallet. Make sure to store the backup phrase in a safe place, as it will be crucial for wallet recovery.
After setting up the wallet, connect it to the Ethereum network. In the wallet application, navigate to the networks settings and choose the Ethereum network. This will allow the wallet to interact with EVM-compatible smart contracts and decentralized applications.
To link your secondary wallet with your Galxe ID, import your Galxe ID using the wallet application. This process may vary depending on the application you are using, so refer to the documentation or support resources provided by the wallet application for detailed instructions.
Once your Galxe ID is imported to the secondary wallet, you need to verify ownership. This is usually done by signing a message or confirming a transaction using your Galxe ID credentials. Again, consult the wallet application's documentation for detailed instructions on how to complete this step.
It's important to ensure the security of your secondary EVM wallet. Take advantage of any available security features provided by the wallet application, such as two-factor authentication or biometric authentication. Additionally, make sure to keep your wallet software up to date to benefit from any security patches and improvements.
That's it! You have successfully set up your secondary EVM wallet and linked it to your Galxe ID. Now you can use this wallet to interact with EVM-based applications and manage your cryptocurrency securely.
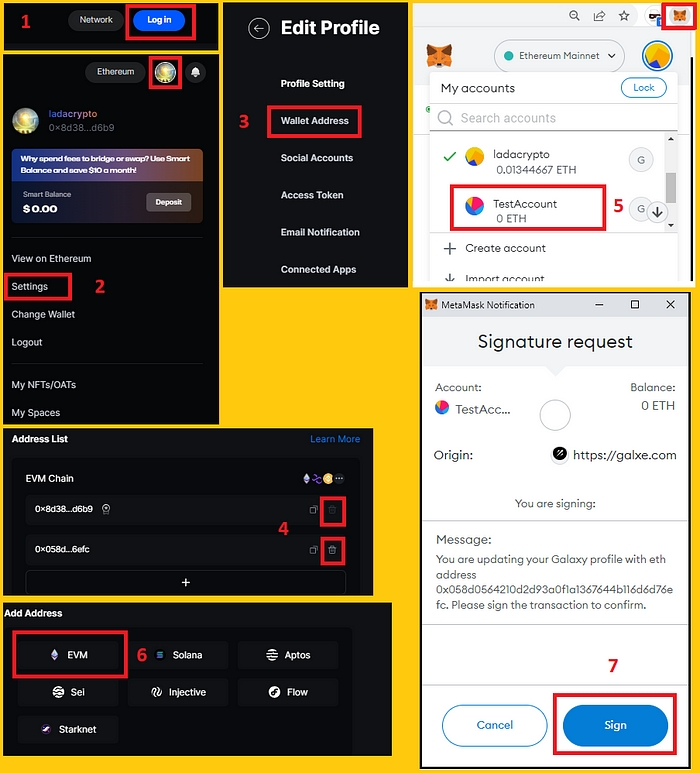
In order to add a secondary EVM wallet to your Galxe ID, you need to follow these step-by-step instructions:
Visit the Galxe ID website and login to your account using your username and password. If you don't have a Galxe ID, you will need to create one first.
After logging in, navigate to the wallet section of your Galxe ID account. This is where you can manage your EVM wallets and connect them to your Galxe ID.
In the wallet section, look for an option to add a new wallet. Click on this option to proceed with adding a secondary EVM wallet.
You will be prompted to enter the details of your secondary EVM wallet, such as the wallet address and any additional information required. Make sure to double-check the entered information for accuracy.
After entering the wallet details, review them one last time and click on the confirm button to connect your Galxe ID to the secondary EVM wallet. Your Galxe ID and the wallet will now be linked.
Once the connection is established, you should see the secondary EVM wallet listed in the wallet section of your Galxe ID account. You can now use it for transactions and other activities supported by Galxe ID.
Before adding a secondary EVM wallet to your Galxe ID, it is important to verify your identity. This step is crucial to ensure the security and integrity of your account. Here is a step-by-step guide on how to verify your identity:
The first step in the verification process is to provide your personal information. This includes your full name, date of birth, and address. It is important to provide accurate and up-to-date information to avoid any issues in the verification process.
Next, you will need to upload certain identification documents to prove your identity. This can include a scan or photo of your passport, driver's license, or national identification card. Make sure that the documents are clear and legible.
Note: Some platforms may require additional documentation, such as a utility bill or bank statement, to verify your address.
Once you have provided the necessary information and uploaded the required documents, you will need to wait for the verification process to be completed. This may take some time, depending on the platform and the volume of verification requests. During this time, it is important to be patient and refrain from making any changes to your account.
Important: Keep in mind that the verification process is in place to protect your account and prevent any fraudulent activities. It is a necessary step to ensure the security of your funds and personal information.
Once your identity has been successfully verified, you can proceed with adding a secondary EVM wallet to your Galxe ID. This will provide you with more options and flexibility in managing your digital assets.
Remember to always follow the platform's instructions and guidelines when it comes to verifying your identity. It is essential to provide accurate and legitimate information to avoid any complications or delays in the process.
Once you have set up your secondary EVM wallet, the next step is to add funds to it. Follow the step-by-step guide below to add funds to your wallet:
Open your primary wallet and go to the "Send" or "Transfer" section.
Copy the address of your secondary EVM wallet.
Paste the address into the recipient field in your primary wallet.
Enter the amount of funds you want to transfer to your secondary wallet.
Double-check the address to ensure it is correct.
Click on the "Send" or "Transfer" button to initiate the transaction.
Wait for the transaction to be confirmed on the blockchain.
Once the transaction is confirmed, the funds will be available in your secondary EVM wallet.
Note: It is important to verify the address before initiating the transfer to avoid any loss of funds. Always double-check and cross-reference the address to ensure its accuracy.
Adding funds to your secondary EVM wallet is a straightforward process that allows you to manage and diversify your cryptocurrency holdings. By following the above steps, you can easily transfer funds from your primary wallet to your secondary EVM wallet.
Once you have successfully added your secondary EVM wallet to your Galxe ID, you can start making transactions using this wallet. Follow these steps to make a transaction:
Launch your Galxe ID application and navigate to the wallet section.
Select your secondary EVM wallet from the list of available wallets.
Click on the "Send" button to initiate a new transaction.
Enter the recipient's address in the designated field. Make sure to double-check the address to avoid any errors.
Specify the amount you want to send and select the appropriate token if necessary.
Review the transaction details and click on the "Send" button to confirm the transaction.
Depending on the network congestion, it may take some time for the transaction to be processed and confirmed. You can track the progress of your transaction using the transaction ID.
Once the transaction is confirmed, the recipient will receive the funds from your secondary EVM wallet.
Remember to keep your secondary EVM wallet secure and avoid sharing your private key or mnemonic phrase with anyone. This will help protect your funds and prevent unauthorized access to your wallet.
When adding a secondary EVM wallet to your Galaxy ID, it is crucial to follow proper security measures to protect your funds and personal information. Here are some steps you can take to secure your secondary wallet:
1. Use a Strong Password: Choose a unique and strong password for your secondary EVM wallet. It should include a combination of numbers, lowercase and uppercase letters, as well as special characters. Avoid using easily guessable passwords or those that you have used for other accounts.
2. Enable Two-Factor Authentication: Activate two-factor authentication (2FA) for your secondary EVM wallet. This adds an extra layer of security by requiring a verification code in addition to your password when logging in. Use a trusted authenticator app like Google Authenticator or Authy for this purpose.
3. Keep Your Wallet Software Updated: Regularly update your wallet software to ensure you have the latest security patches and bug fixes. Developers often release updates to address vulnerabilities and enhance security. Enable automatic updates if possible.
4. Backup Your Wallet: Create a secure backup of your wallet's private keys or seed phrase. Store this backup in a safe location, preferably offline or in a hardware wallet. This will help you recover your funds in case your wallet is lost or compromised.
5. Be Cautious of Phishing Attempts: Be vigilant of phishing attempts, which aim to deceive you into revealing your wallet credentials. Do not click on suspicious links or provide your wallet information to untrustworthy sources. Always ensure you are accessing your wallet through the official website or app.
6. Use Secure Networks: Avoid accessing your secondary EVM wallet on public or unsecured Wi-Fi networks. These networks can be vulnerable to hacking and snooping. Use a trusted and secure internet connection when logging into your wallet or conducting transactions.
7. Regularly Check Your Wallet Activity: Monitor your wallet activity on a regular basis. Look out for any unauthorized transactions or suspicious behavior. If you notice any suspicious activity, immediately take steps to secure your wallet and contact the wallet provider for assistance.
By following these security precautions, you can enhance the safety of your secondary EVM wallet and protect your funds from potential threats.
Why should I add a secondary EVM wallet to my Galxe ID?
Adding a secondary EVM wallet to your Galxe ID is important for added security and convenience. By having a secondary wallet, you can keep your funds separate and access them easily, while keeping your main wallet secure.
How do I add a secondary EVM wallet to my Galxe ID?
Adding a secondary EVM wallet to your Galxe ID is a simple process. First, log in to your Galxe ID account. Then, navigate to the "Wallets" section and click on "Add Wallet." From there, you can select the type of EVM wallet you want to add and follow the on-screen instructions to connect it to your Galxe ID.
Can I add multiple secondary EVM wallets to my Galxe ID?
Yes, you can add multiple secondary EVM wallets to your Galxe ID. This is especially useful if you have different wallets for different purposes, such as one for personal use and another for business transactions. Simply follow the steps outlined in the previous question to add each additional wallet.
Is it safe to add a secondary EVM wallet to my Galxe ID?
Yes, it is safe to add a secondary EVM wallet to your Galxe ID. Galxe ID is built with security in mind and takes measures to protect your account and wallets. However, it is important to remember to use strong, unique passwords for each wallet and to keep your access credentials secure.
What are the benefits of adding a secondary EVM wallet to my Galxe ID?
Adding a secondary EVM wallet to your Galxe ID offers several benefits. First, it allows you to keep your funds separate and organized, making it easier to track and manage your transactions. Additionally, by having a secondary wallet, you can have a backup in case anything happens to your main wallet or account.
How can I add a secondary EVM wallet to my GalaxE ID?
To add a secondary EVM wallet to your GalaxE ID, you need to follow these steps:
What is the purpose of adding a secondary EVM wallet to GalaxE ID?
The purpose of adding a secondary EVM wallet to GalaxE ID is to provide users with an additional layer of security and flexibility in managing their EVM assets. It allows users to have multiple wallets associated with their GalaxE ID, which can be useful for different purposes or to separate funds.
2022-2024 @ Adding a secondary evm wallet to your galxe id a step by step guide
Visit the Galxe website at .