Your Galxe ID is a powerful tool that allows you to manage your Ethereum Virtual Machine (EVM) wallet seamlessly. However, there may be instances when you want to connect a secondary EVM wallet to your Galxe ID for various reasons, such as diversifying your holdings or using different wallets for different purposes. In this step-by-step guide, we will walk you through the process of connecting a secondary EVM wallet to your Galxe ID, ensuring a smooth and secure experience.
Step 1: Create a new EVM wallet
The first step is to create a new EVM wallet that you want to connect to your Galxe ID. You can choose from a variety of EVM wallets available in the market, such as MetaMask, Trust Wallet, or MyEtherWallet. Make sure to follow the instructions provided by the wallet provider to set up your new wallet. It is recommended to use a reliable and trusted wallet that offers strong security features to safeguard your digital assets.
Step 2: Export your wallet private key or seed phrase
Once you have set up your new EVM wallet, you need to export your wallet private key or seed phrase. This is a crucial step as it allows you to import your wallet into your Galxe ID securely. Wallet providers usually provide an option to export your private key or seed phrase. Make sure to follow the instructions provided by your wallet provider to export this information.
Step 3: Import your secondary EVM wallet into your Galxe ID
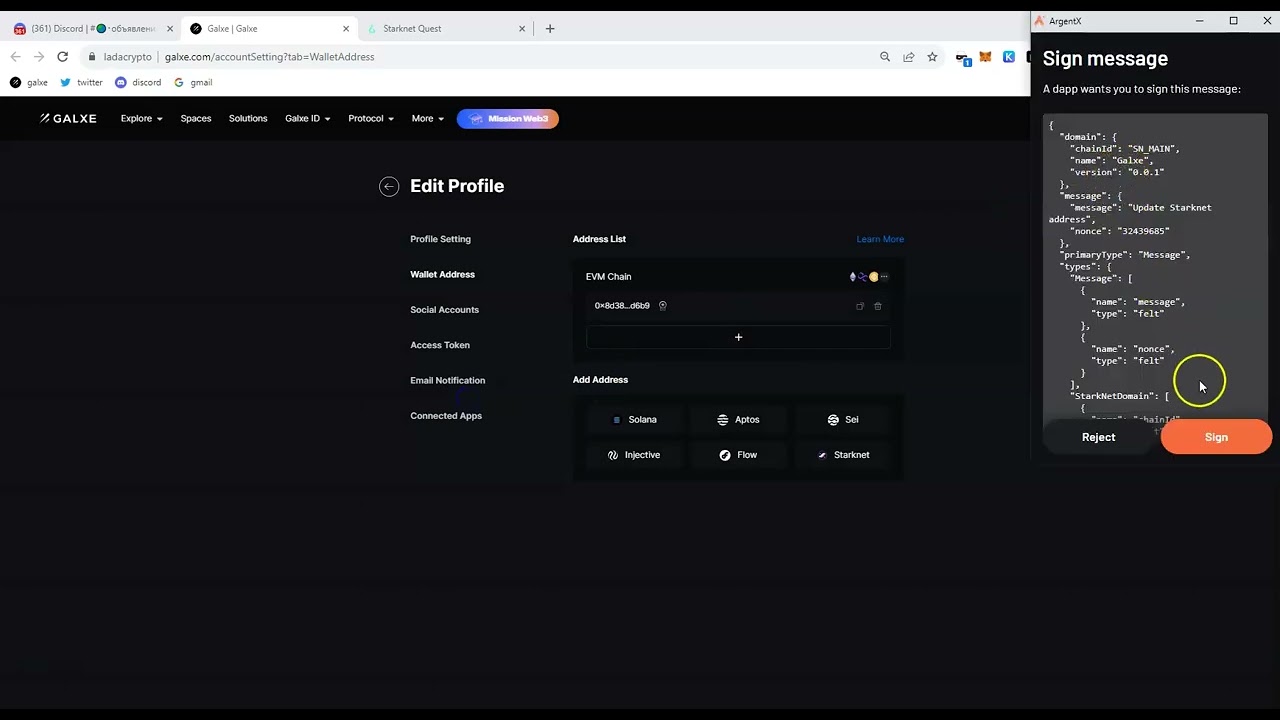
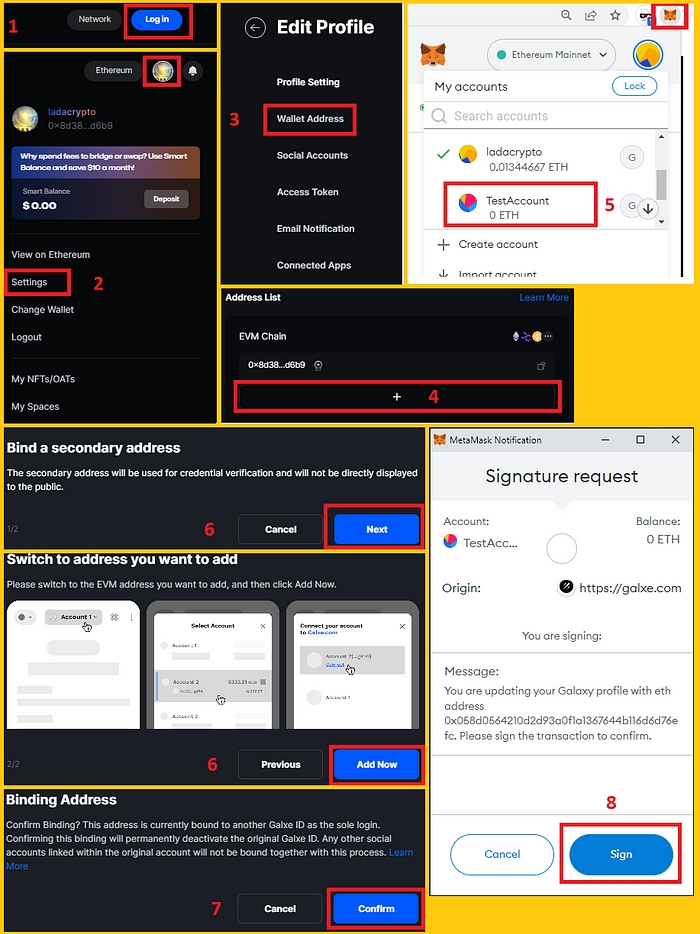
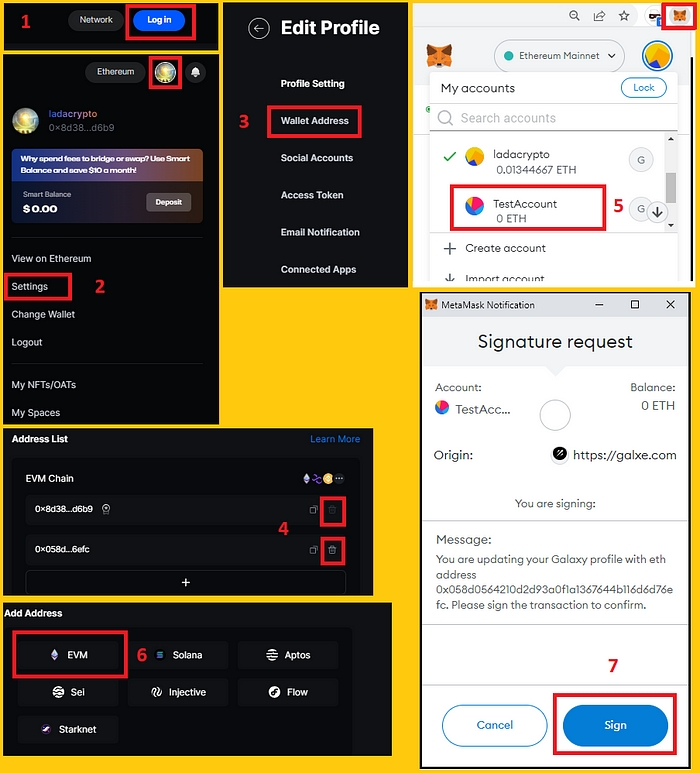
Now it's time to import your secondary EVM wallet into your Galxe ID. Open your Galxe ID application and navigate to the wallet settings. Look for the option to import a wallet and choose the method to import using a private key or seed phrase. Enter your wallet private key or seed phrase that you exported from your secondary EVM wallet. Follow the instructions provided by Galxe ID to complete the import process.
Step 4: Verify and confirm the connection
After importing your secondary EVM wallet into your Galxe ID, it's important to verify and confirm the connection. Check if your wallet balance, transaction history, and other wallet details are accurately displayed in your Galxe ID. Test the functionality of your secondary EVM wallet by making a small transaction to ensure everything is working properly. Once you have verified the connection and confirmed the successful integration, you can start using your secondary EVM wallet within your Galxe ID without any inconvenience.
Connecting a secondary EVM wallet to your Galxe ID provides you with flexibility and accessibility to manage multiple wallets with ease. However, always prioritize security and choose reputable wallet providers to ensure the safety of your digital assets.
Connecting a secondary EVM wallet to your Galxe ID allows you to have more flexibility and control over your digital assets. Follow these step-by-step instructions to seamlessly connect your secondary EVM wallet to your Galxe ID.
Step 1:
Open your Galxe ID application and navigate to the settings tab.
Step 2:
Under the Wallets section, select the option to add a new wallet.
Step 3:
A list of supported EVM wallets will appear. Choose your secondary wallet from the list.
Step 4:
Follow the on-screen instructions to connect your secondary wallet. This may involve entering your wallet's address or scanning a QR code.
Step 5:
After successfully connecting your secondary wallet, you will be able to view its balance and transaction history within your Galxe ID application.
Step 6:
Your Galxe ID will now automatically synchronize with your secondary wallet, allowing you to seamlessly manage your digital assets across multiple wallets.
By connecting a secondary EVM wallet to your Galxe ID, you can keep track of all your digital assets in one place and easily switch between wallets when needed. This streamlined process ensures the security and convenience of managing your crypto holdings.
The first step in connecting a secondary EVM wallet to your Galaxie ID is to download the EVM wallet software. There are several options available, depending on your preferred platform and wallet provider.
MetaMask is a popular EVM wallet that is available as a browser extension for Chrome, Firefox, and Brave. To download MetaMask, follow these steps:
Open your preferred web browser (Chrome, Firefox, or Brave).
Click on the "Download" button.
Follow the instructions to add the MetaMask extension to your browser.
Once the extension is installed, click on the MetaMask icon in your browser toolbar to set up your wallet.
Trust Wallet is another popular EVM wallet that is available as a mobile app for iOS and Android. To download Trust Wallet, follow these steps:
Open the App Store (for iOS) or Google Play Store (for Android) on your mobile device.
Search for "Trust Wallet" in the search bar.
Click on the "Install" or "Get" button to download and install the Trust Wallet app.
Once the app is installed, open it and follow the instructions to set up your wallet.
These are just two examples of EVM wallets that you can use to connect to your Galaxie ID. There are other options available as well, so feel free to explore and choose the one that best suits your needs. Once you have downloaded and set up your EVM wallet, you can proceed to the next step of connecting it to your Galaxie ID.
Once you have installed the secondary EVM wallet application on your device, you can proceed with creating a new wallet. This wallet will be used to connect to your Galxe ID and securely manage your digital assets.
Follow these steps to create a new wallet:
Open the secondary EVM wallet application on your device.
On the home screen, locate the "Create New Wallet" option and tap on it.
You will be prompted to choose a secure password for your wallet. Make sure to select a strong password that includes a combination of letters, numbers, and special characters.
After entering your chosen password, confirm it by re-entering it in the provided field.
Next, you will be presented with a recovery phrase. This phrase is crucial for recovering your wallet in case you lose access to your device. Make sure to write down the recovery phrase and keep it in a safe place. Do not share it with anyone.
Once you have securely stored your recovery phrase, you will be asked to enter it in the provided field to verify that you have saved it correctly.
After successfully verifying the recovery phrase, your new wallet will be created.
Now, you can proceed to connect your newly created wallet to your Galxe ID by following the next step in this guide.
Creating a new wallet is an essential step in connecting a secondary EVM wallet to your Galxe ID. It ensures the security and integrity of your digital assets and allows you to securely manage them through your Galxe ID ecosystem.
Now that you have successfully connected your secondary EVM wallet to your Galxe ID, it is important to take steps to secure your wallet and protect your funds. Here are some important measures you should take:
When setting up your wallet, make sure to create a strong and unique password. Avoid using common words, personal information, or easily guessable combinations. Include a mix of uppercase and lowercase letters, numbers, and special characters. This will help protect your wallet from unauthorized access.
Enable two-factor authentication for your wallet whenever possible. This adds an extra layer of security by requiring an additional code, usually sent to your mobile device, to access your wallet. It helps prevent unauthorized access even if someone obtains your password.
Most EVM wallets offer options for 2FA, such as Google Authenticator or SMS verification. Enable this feature and follow the instructions to set it up securely.
It is essential to create a backup of your wallet. In case your device is lost, stolen, or damaged, you can easily restore your wallet and access your funds again. Many wallets provide an option to create a backup file or mnemonic phrase.
Store this backup in a safe and secure location, such as a hardware wallet, offline storage, or a password-protected encrypted file. It is recommended to keep multiple backups in different locations to minimize the risk of losing access to your wallet.
Remember to never share your backup file or mnemonic phrase with anyone as it could lead to unauthorized access to your funds.
Ensure that your wallet and the operating system of your device are up to date with the latest security patches and updates. Developers often release updates with bug fixes and security improvements, so it is important to install these updates promptly.
By keeping your wallet and device software up to date, you can benefit from the latest security enhancements and reduce the risk of vulnerabilities that could be exploited by attackers.
Following these security measures will help ensure the safety of your secondary EVM wallet and protect your funds from unauthorized access. Take the time to implement these steps and enjoy the peace of mind that comes with knowing your wallet is secure.
In order to connect a secondary EVM wallet to your Galxe ID, you will need to obtain your Galxe ID. Follow these steps to obtain your Galxe ID:
Open the Galxe ID website.
Click on the "Sign in" button located at the top right corner of the page.
Enter your username and password to log into your Galxe ID account.
After successfully logging in, you will be redirected to your Galxe ID dashboard.
On your dashboard, you will find your Galxe ID displayed. It will be a unique alphanumeric code.
Copy your Galxe ID by highlighting the code and pressing Ctrl+C on your keyboard or right-clicking and selecting "Copy".
Once you have obtained your Galxe ID, you can proceed to the next step to connect your secondary EVM wallet to your Galxe ID.
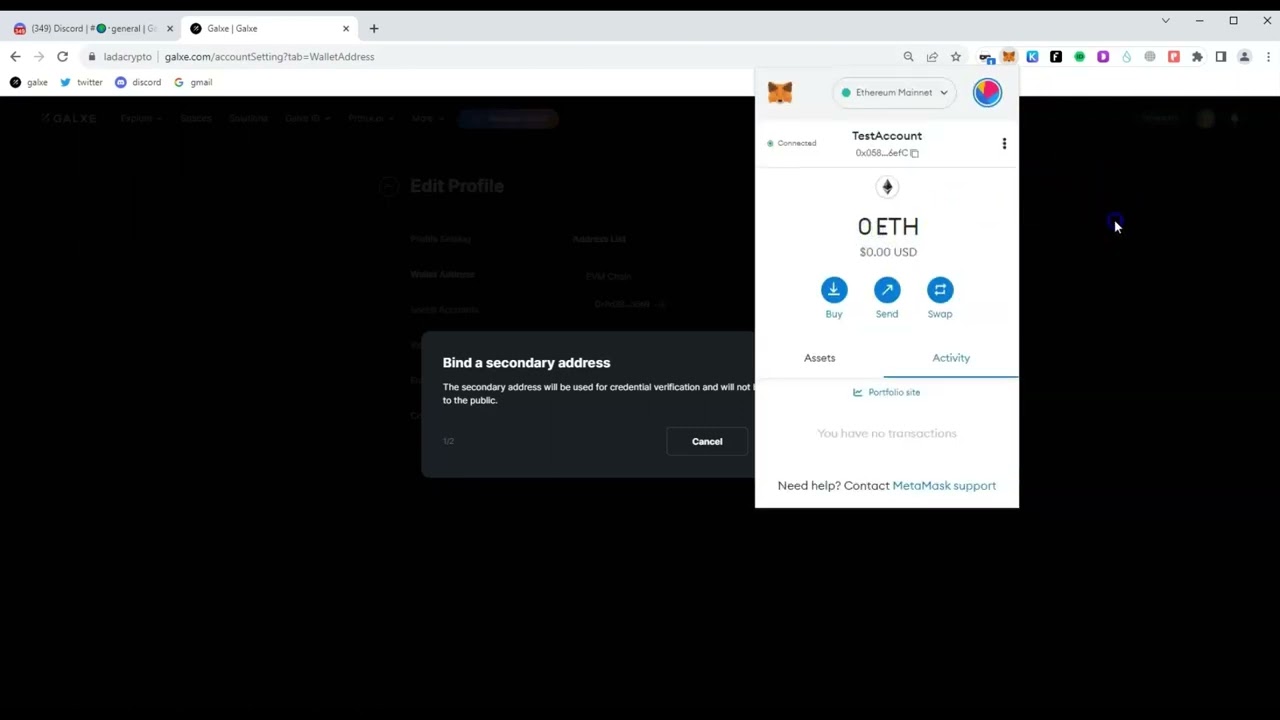
Once you have successfully connected your secondary EVM wallet to your Galxe ID, you can now access it to manage your funds and perform transactions. To access your secondary wallet, follow these steps:
Open the Galxe ID app or website on your device.
Sign in to your Galxe ID account using your unique credentials.
From the dashboard, navigate to the "Wallets" tab.
Locate your connected secondary EVM wallet in the list of wallets.
Select your secondary wallet to access its details and functionalities.
Once you have accessed your secondary EVM wallet, you will have full control over your funds and can perform various operations such as sending and receiving tokens, checking your transaction history, and managing your wallet settings.
It is important to keep your Galxe ID account credentials secure to ensure the safety of your secondary EVM wallet and funds. Avoid sharing your login information or giving access to unauthorized individuals.
By following these steps, you will be able to easily access your secondary EVM wallet and leverage its features to securely manage your digital assets.
Now that you have set up your secondary EVM wallet, you can connect it to your Galxe ID for seamless integration. Follow these steps to connect your Galxe ID:
Step 1: Open your Galxe ID app on your mobile device.
Step 2: Tap on the settings icon in the top-right corner of the screen.
Step 3: From the settings menu, select "Manage Wallets".
Step 4: Tap on the "Add Wallet" button.
Step 5: Choose the option to connect an external wallet.
Step 6: Enter the address or scan the QR code of your secondary EVM wallet.
Step 7: Verify the connection by signing a transaction in your secondary EVM wallet.
Step 8: Once verified, your secondary EVM wallet will be connected to your Galxe ID.
By connecting your secondary EVM wallet to your Galxe ID, you can easily manage and access your assets across different platforms. This integration enhances the security and convenience of using your EVM wallet with Galxe ID.
Remember to keep your Galxe ID and secondary EVM wallet secure and updated to protect your funds and personal information.
Verifying your identity is an important step in the process of connecting a secondary EVM wallet to your Galxe ID. This verification process helps ensure the security of your account and protects against unauthorized access.
Go to the Galxe ID website and log in to your account. Once logged in, navigate to the verification page. This page usually can be found in the account settings or security settings section.
On the verification page, you will be prompted to provide certain information to verify your identity. This may include personal details such as your full name, date of birth, and address. Additionally, you might need to upload scanned copies of your identification documents like a passport or driver's license.
Make sure to double-check all the information you provide to ensure its accuracy and completeness. Any mistakes or missing information could delay the verification process.
After submitting your information, you will need to wait for the verification process to be completed. This can take anywhere from a few hours to a few days, depending on the platform's procedures and workload. During this time, it's important to be patient and avoid making any changes or updates to your account settings.
Some platforms may also send you email updates or notifications regarding the status of your verification process. Keep an eye on your inbox for any communications related to your identity verification.
Once your identity has been successfully verified, you will receive a confirmation notification. This means that you can now proceed to connect your secondary EVM wallet to your Galxe ID. With the verification process completed, you can have peace of mind knowing that your account is secure and protected.
It's important to note that if your identity verification is unsuccessful for any reason, you may be required to provide additional information or documentation. Follow the instructions provided by the platform to address any issues and reattempt the verification process.
Remember, verifying your identity is an essential step in safeguarding your digital assets and ensuring the integrity of your Galxe ID account.
Once your secondary EVM wallet is connected to your Galaxie ID, you need to authorize transactions before they can be executed.
To authorize a transaction, follow these steps:
Open your secondary EVM wallet and navigate to the transaction you want to authorize.
Review the details of the transaction, including the recipient address, the amount, and any additional data.
Verify that the transaction details are correct and that you are comfortable proceeding with the transaction.
If you are satisfied with the transaction details, click on the "Authorize" button or a similar option in your EVM wallet.
You may be prompted to enter your Galaxie ID password or provide any other required authentication.
Once the authorization is complete, the transaction will be added to the blockchain and executed.
You can track the progress of the transaction using the transaction hash or check your wallet balance to see the updated amount.
It is important to carefully review and authorize transactions to ensure their accuracy and security. Double-check the recipient address and amount to prevent any unintended transfers of funds.
1
Open your secondary EVM wallet and navigate to the transaction you want to authorize.
2
Review the details of the transaction, including the recipient address, the amount, and any additional data.
3
Verify that the transaction details are correct and that you are comfortable proceeding with the transaction.
4
If you are satisfied with the transaction details, click on the "Authorize" button or a similar option in your EVM wallet.
5
You may be prompted to enter your Galaxie ID password or provide any other required authentication.
6
Once the authorization is complete, the transaction will be added to the blockchain and executed.
7
You can track the progress of the transaction using the transaction hash or check your wallet balance to see the updated amount.
Remember to keep your Galaxie ID and secondary EVM wallet secure to prevent unauthorized access to your funds. It is also advisable to regularly monitor your transactions and account activity for any suspicious or fraudulent actions.
Now that you have connected a secondary EVM wallet to your Galaxy ID, you can easily manage all your wallets in one place. This step-by-step guide will show you how to manage your EVM wallets:
Access your Galaxy ID dashboard by logging into your account.
On the dashboard, navigate to the "Wallets" section.
Here you will see a list of all the EVM wallets connected to your Galaxy ID.
To view the details of a specific wallet, click on the "View" button next to it.
This will open a new page where you can see the wallet address, balance, transaction history, and other relevant information.
If you want to send funds from a particular wallet, click on the "Send" button.
Enter the recipient's address, the amount you want to send, and any additional details.
Review the transaction details and confirm the transaction.
To receive funds, click on the "Receive" button for the desired wallet.
A unique wallet address will be generated, which you can share with others to receive funds.
If you want to remove a wallet from your Galaxy ID, click on the "Remove" button.
Confirm the removal and the wallet will be disconnected from your Galaxy ID.
You can also add new EVM wallets by clicking on the "Add Wallet" button and following the instructions.
Managing your EVM wallets through your Galaxy ID makes it convenient and efficient to handle all your wallet activities. Remember to keep your wallet information secure and backup your wallet data regularly.
Note: The steps mentioned above are specific to managing EVM wallets through Galaxy ID and may vary depending on the platform or wallet provider you are using.
What is a secondary EVM Wallet?
A secondary EVM wallet is an additional wallet that you can connect to your Galxe ID. It allows you to manage multiple wallets and easily switch between them.
Why should I connect a secondary EVM wallet to my Galxe ID?
Connecting a secondary EVM wallet to your Galxe ID offers several benefits. Firstly, it allows you to manage multiple wallets in one place, making it easier to keep track of your assets. Secondly, it provides an extra layer of security as you can use different wallets for different purposes. Lastly, it simplifies the process of switching between wallets, saving you time and effort.
Can I connect any EVM wallet to my Galxe ID?
In most cases, you should be able to connect any EVM wallet to your Galxe ID. However, it is always recommended to check if the specific wallet you want to connect is supported by Galxe ID. You can usually find this information in the settings or FAQ section of your Galxe ID account.
Is it possible to disconnect a secondary EVM wallet from my Galxe ID?
Yes, you can disconnect a secondary EVM wallet from your Galxe ID. Simply go to the settings or account section of your Galxe ID account and look for the option to disconnect or remove a secondary wallet. Follow the instructions provided to complete the disconnection process.
What is a secondary EVM wallet?
A secondary EVM wallet is an additional wallet that can be connected to your Galactic ID. It allows you to have multiple EVM wallets linked to your Galactic ID.
2022-2024 @ Connecting a secondary evm wallet to your galxe id a step by step guide
Go to the MetaMask website at .