Are you tired of juggling multiple wallets and struggling to keep track of your cryptocurrency holdings? Switching your main EVM wallet with Galaxy ID is the answer you've been searching for. Galaxy ID, a revolutionary platform, allows you to seamlessly transition your main wallet across different EVM chains with ease. In this step-by-step guide, we will walk you through the process of switching your main EVM wallet, so you can streamline your crypto journey and take full advantage of all that Galaxy ID has to offer.
Step 1: Creating Your Galaxy ID
The first step in switching your main EVM wallet is to create your Galaxy ID. Simply head to the Galaxy ID website and click on the "Create ID" button. Fill in the required information, including your email address and a secure password. Once you've completed the form, click "Create" to generate your unique Galaxy ID. Remember to keep your login credentials safe and secure.
Step 2: Accessing Your Main EVM Wallet
Next, you'll need to access your main EVM wallet that you wish to switch. Whether you're using MetaMask, Trust Wallet, or any other compatible wallet, ensure you have the wallet's private key or seed phrase on hand. This is crucial as you'll need to import your wallet into Galaxy ID in the next step.
Step 3: Importing Your Wallet to Galaxy ID
Once you have your Galaxy ID and access to your main EVM wallet, it's time to import your wallet into Galaxy ID. Open the Galaxy ID platform, click on the "Import Wallet" button, and select the option to import your existing wallet using the private key or seed phrase. Follow the on-screen instructions and enter the required information to successfully import your wallet.
Step 4: Verifying Your Ownership
After importing your wallet, you will need to verify your ownership to ensure the security of your funds. Galaxy ID will guide you through a simple verification process, which may include proving ownership of the wallet through a transaction or signing a message. Once the verification is completed, your main EVM wallet will be successfully switched to Galaxy ID.
By switching your main EVM wallet with Galaxy ID, you gain the advantage of having a single wallet across various EVM chains, simplifying your crypto experience. With this step-by-step guide, you can make the transition effortlessly and enjoy the enhanced convenience and flexibility that Galaxy ID offers.
Switching your main EVM wallet with Galxe ID is a simple process that can be done step by step. Galxe ID is a secure and user-friendly wallet that allows you to store and manage your EVM-based assets. By switching your main EVM wallet to Galxe ID, you can have greater control over your funds and access to a wide range of features.
To switch your main EVM wallet with Galxe ID, follow these steps:
1
Download and install the Galxe ID app on your device.
2
Open the Galxe ID app and create a new account.
3
Securely store your Galxe ID recovery phrase in a safe place.
4
Transfer your EVM-based assets from your current wallet to your Galxe ID wallet by following the specific instructions provided by your current wallet.
5
Verify that your assets have been successfully transferred to your Galxe ID wallet by checking the balance and transaction history.
By switching your main EVM wallet to Galxe ID, you can take advantage of its advanced security features, user-friendly interface, and seamless integration with various decentralized applications. Galxe ID also offers support for non-fungible tokens (NFTs) and multi-chain interoperability, allowing you to manage a diverse range of assets all in one place.
In this guide, we will walk you through the process of switching your main EVM wallet with Galxe ID. Follow these steps carefully to ensure a smooth transition:
The first step is to create a Galxe ID. Visit the Galxe website and click on the "Create Galxe ID" button. Fill in the required information and follow the prompts to set up your Galxe ID. Make sure to choose a strong password to protect your account.
Once you have created your Galxe ID, you will need to connect your EVM wallet to it. Open your EVM wallet and navigate to the settings or preferences menu. Look for an option to connect or link your wallet to an external service. Select this option and choose Galxe ID from the list of available services. Follow the prompts to complete the connection.
Now that your EVM wallet is connected to Galxe ID, it's time to transfer your funds. Open your EVM wallet and navigate to the transfer or send menu. Enter your Galxe ID address as the recipient and specify the amount of funds you want to transfer. Confirm the transaction and wait for the funds to be transferred to your Galxe ID.
After the transfer is complete, it's important to verify that your funds have been successfully transferred to your Galxe ID. Open your Galxe ID account and navigate to the wallet or balance section. You should see the transferred funds reflected in your Galxe ID balance. If you don't see the funds, double-check the transaction details in your EVM wallet and contact the Galxe support team for assistance.
Now that your main EVM wallet has been switched with Galxe ID, you will need to update your payment information with any services or platforms that you use. This includes updating your Galxe ID address as the payment destination for any recurring payments or subscriptions.
To ensure the security of your Galxe ID, it's important to take some additional steps. Enable two-factor authentication (2FA) for your Galxe ID account to add an extra layer of protection. Regularly update your password and avoid sharing your Galxe ID credentials with anyone.
Following these steps will help you smoothly switch your main EVM wallet with Galxe ID. Enjoy the enhanced security and features that Galxe ID offers!
1
Create a Galxe ID
2
Connect your EVM Wallet to Galxe ID
3
Transfer Your Funds
4
Verify the Transfer
5
Update Your Payment Information
6
Secure Your Galxe ID
Switching your main EVM wallet with Galxe ID is a crucial step in ensuring the security and integrity of your digital assets. Here are a few reasons why understanding the importance of this process is essential:
Enhanced Security: By switching to Galxe ID, you are taking advantage of advanced security features that provide an extra layer of protection for your wallet and its stored assets. Galxe ID implements state-of-the-art encryption and authentication methods to safeguard your funds from potential threats.
Decentralization: Galxe ID is built on decentralized blockchain technology, which means that you have full control over your wallet without any central authority. This ensures that no single entity can access or tamper with your funds, providing you with a true sense of ownership and autonomy.
Seamless Integration: Switching your main EVM wallet with Galxe ID is a smooth and hassle-free process. Galxe ID is designed to seamlessly integrate with various EVM-compatible wallets, making it easy for you to transition without losing any functionality or access to your assets.
Improved User Experience: Galxe ID offers a user-friendly and intuitive interface, making it convenient for both novice and experienced users. With Galxe ID, you can effortlessly manage your wallet, track transactions, and explore additional features to enhance your overall user experience.
Future Proofing: As the blockchain industry evolves, having a wallet solution like Galxe ID ensures that you stay updated with the latest developments and advancements. By switching to Galxe ID, you are future-proofing your wallet and aligning yourself with the latest security standards and technological innovations.
In conclusion, understanding the importance of switching your main EVM wallet with Galxe ID is vital for safeguarding your digital assets, ensuring a seamless user experience, and staying ahead in the ever-evolving blockchain landscape. Take the necessary steps today to switch to Galxe ID and enjoy the numerous benefits it offers.
Galxe ID is a revolutionary platform that offers numerous benefits and features, making it a compelling choice for switching your main EVM wallet. Here are some reasons why you should consider making the switch:
Galxe ID utilizes the latest security protocols and encryption techniques to ensure the safety of your digital assets. With Galxe ID, you can have peace of mind knowing that your wallet and funds are secure from any potential threats.
Galxe ID provides a user-friendly interface that is easy to navigate, even for beginners. The platform is designed with simplicity in mind, allowing you to easily manage your wallet and access the features you need.
Galxe ID seamlessly integrates with the EVM ecosystem, allowing you to switch your main wallet without any hassle. You can connect your Galxe ID to various decentralized applications and interact with the Ethereum network effortlessly.
With Galxe ID, you gain access to advanced functionality that enhances your experience with the EVM ecosystem. The platform offers features such as multi-signature support, smart contract interactions, and decentralized exchange integration, among others.
Galxe ID is developed by a dedicated community of developers and enthusiasts who are committed to improving the platform. By switching to Galxe ID, you become a part of this vibrant community, contributing to the growth and development of the platform.
In conclusion, Galxe ID provides enhanced security, a user-friendly interface, seamless integration, advanced functionality, and a supportive community. These reasons make Galxe ID an excellent choice for switching your main EVM wallet and embracing the future of decentralized finance.
Galxe ID is a powerful and versatile EVM wallet that offers a number of advantages over traditional wallets. Here are some key benefits of using Galxe ID as your main EVM wallet:
One of the major advantages of Galxe ID is its enhanced security features. With Galxe ID, your wallet is protected by advanced encryption algorithms, making it extremely difficult for hackers to gain unauthorized access to your funds. Additionally, Galxe ID implements multi-factor authentication, ensuring that only authorized individuals can access your wallet.
Galxe ID offers a user-friendly interface that is easy to navigate, even for new users. The wallet provides simple and intuitive controls, allowing you to easily manage your EVM assets, send and receive transactions, and interact with decentralized applications (dApps) on the Ethereum network.
Galxe ID seamlessly integrates with a wide range of decentralized applications (dApps) on the Ethereum network. This means that you can easily access and interact with your favorite dApps directly from your Galxe ID wallet, without the need for any additional software or interfaces.
In addition to Ethereum and its associated tokens, Galxe ID supports a variety of other cryptocurrencies built on the Ethereum Virtual Machine (EVM). This means that you can manage all of your EVM-based assets in a single wallet, eliminating the need for multiple wallets and providing a more convenient and streamlined experience.
Galxe ID offers advanced customization options, allowing you to personalize your wallet according to your preferences. You can choose from a variety of themes, layouts, and color schemes, and even customize the display of your assets and transaction history. This level of customization helps to create a more personalized and enjoyable user experience.
In conclusion, using Galxe ID as your main EVM wallet offers numerous advantages including enhanced security, a user-friendly interface, seamless integration with dApps, support for multiple cryptocurrencies, and advanced customization options. By switching to Galxe ID, you can enjoy a more secure and convenient way to manage your EVM assets and interact with the Ethereum network.
Before switching your main EVM wallet with Galxe ID, it is important to thoroughly prepare and backup your existing wallet to ensure the safety of your funds. Follow the steps below to properly prepare for the switching process:
Step 2
Ensure that you have access to a secure and reliable internet connection. This is important as you will need to connect to the Galxe ID platform to switch your main wallet.
Step 3
Make sure that your computer or device meets the minimum system requirements to use Galxe ID. Check for any necessary software updates or installations to ensure compatibility.
Step 4
Verify the authenticity of the Galxe ID platform. Make sure to only download the official Galxe ID application or access the official website. Avoid downloading any third-party applications or visiting suspicious websites.
Step 5
Consider enabling additional security measures such as two-factor authentication (2FA) or biometric authentication. These extra layers of security can help protect your wallet and funds from unauthorized access.
By properly preparing and taking these steps before switching your main EVM wallet with Galxe ID, you can help ensure a smooth and secure transition to your new wallet.
To switch your main EVM wallet with Galxe ID, you will first need to create a Galxe ID account. Follow the steps below to create your account:
Visit the Galxe ID website or download the Galxe ID app from the app store.
Click on the "Sign Up" or "Create Account" button to begin the registration process.
Provide your email address and create a strong password for your Galxe ID account.
Verify your email address by clicking on the link sent to your inbox.
Once your email is verified, you will be prompted to set up additional security measures such as enabling two-factor authentication.
Follow the on-screen instructions to complete the security setup.
Once your account is created and secured, you can proceed to switch your main EVM wallet with Galxe ID.
It is important to note that Galxe ID provides a secure and convenient way to manage your EVM wallets. By creating a Galxe ID account, you can access and switch between different EVM wallets with ease, enhancing your overall cryptocurrency experience.
When switching your main EVM wallet with Galxe ID, it is important to securely transfer your funds to the new wallet to ensure their safety. Follow these steps to securely transfer your funds:
Create a backup of your current wallet: Before making any changes, it is important to create a backup of your current EVM wallet. This backup will serve as a fail-safe in case anything goes wrong during the transfer process. Make sure to securely store the backup in a place that is separate from your computer or internet-connected devices.
Generate a new Galxe ID: To switch your main EVM wallet, you will first need to generate a new Galxe ID. This ID will serve as the new address for your wallet.
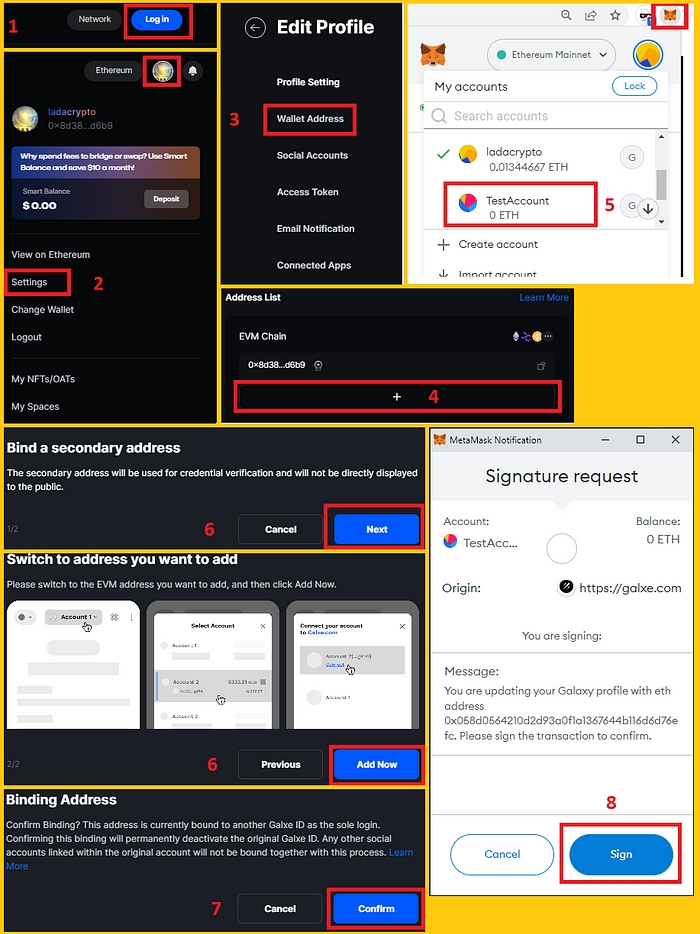
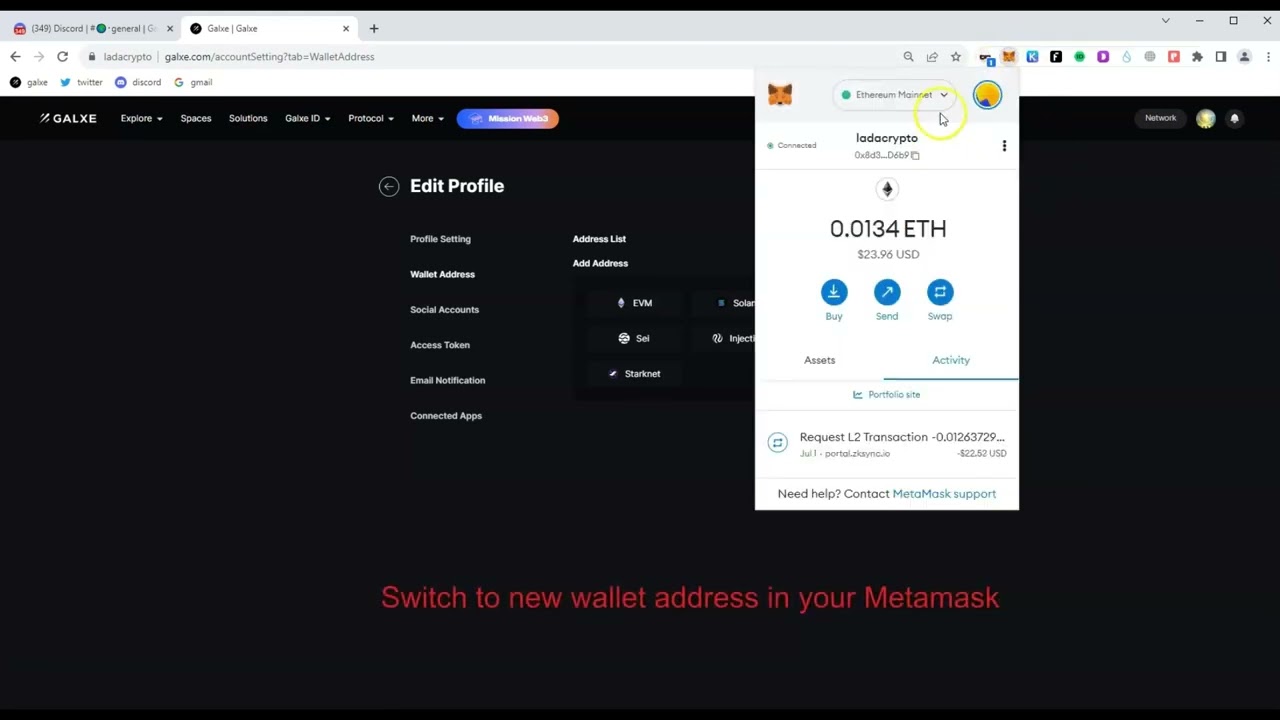
Update your wallet address: Once you have generated a new Galxe ID, you will need to update your wallet address in any services or platforms that have your old address. This includes cryptocurrency exchanges, decentralized applications, and any other services that you use with your EVM wallet.
Transfer your funds: To transfer your funds to the new wallet, you will need to initiate a transaction from your old wallet to the new Galxe ID. When initiating the transaction, double-check that you have entered the correct Galxe ID to avoid any errors or loss of funds.
Verify the transfer: After initiating the transaction, it is important to verify that the funds have been successfully transferred to your new Galxe ID. You can do this by checking the transaction status on the blockchain explorer or by accessing your new wallet using the Galxe ID.
Securely store your new wallet: Once your funds have been successfully transferred to the new Galxe ID, it is crucial to securely store your new wallet. This includes using strong passwords, enabling two-factor authentication, and keeping your wallet information confidential.
By following these steps, you can securely transfer your funds when switching your main EVM wallet with Galxe ID. Remember to always exercise caution and double-check all information to ensure the safety of your funds.
Switching your main EVM wallet with Galxe ID is a simple process that can be done in a few easy steps. Follow the guide below to make the switch:
Step 1:
Download and install the Galxe ID app from the official app store for your mobile device.
Step 2:
Open the Galxe ID app and create a new account. Make sure to secure your account with a strong password.
Step 3:
After creating your account, navigate to the wallet section within the app.
Step 4:
From the wallet section, select the option to switch your main EVM wallet.
Step 5:
You will be prompted to enter the address of your current EVM wallet. Enter the wallet address correctly and proceed.
Step 6:
Galxe ID will then validate the wallet address and confirm the switch. Review the details and confirm the switch.
Step 7:
Once the switch is confirmed, your main EVM wallet will be replaced with the new wallet associated with your Galxe ID account.
Step 8:
To ensure a smooth transition, make sure to update any services or platforms that are linked to your EVM wallet with the new wallet address.
Following these step-by-step instructions will allow you to switch your main EVM wallet with Galxe ID seamlessly. Enjoy the enhanced security and convenience that Galxe ID provides!
Before switching your main EVM wallet with Galxe ID, it is important to export your current wallet to ensure that you have a backup of your funds and can easily access them in the future. Here is a step-by-step guide on how to export your current wallet:
Open your current EVM wallet.
Locate the "Export" or "Backup" option in your wallet's settings. This option may vary depending on the wallet you are using.
Click on the "Export" or "Backup" option and choose the format in which you want to export your wallet. Common formats include JSON, Keystore, or Mnemonic Phrase.
Choose a secure location on your device, such as a password-protected folder or an encrypted USB drive, to save your exported wallet file.
Follow the prompts to complete the export process. Make sure to note down any necessary passwords or recovery phrases and keep them in a secure place.
Once the export is complete, verify that the exported wallet file is successfully saved in the chosen location.
By exporting your current wallet, you have created a backup that can be imported into Galxe ID or any other compatible EVM wallet. This backup ensures that you can access your funds and continue using them seamlessly with Galxe ID.
What is Galxe ID?
Galxe ID is a unique identification system that allows users to switch their main EVM wallet. It provides a secure and seamless way to manage different wallets and access various decentralized applications.
Why should I switch my main EVM wallet with Galxe ID?
Switching your main EVM wallet with Galxe ID offers several benefits. It provides enhanced security for your funds, allows for easy management of multiple wallets, and enables seamless integration with different decentralized applications.
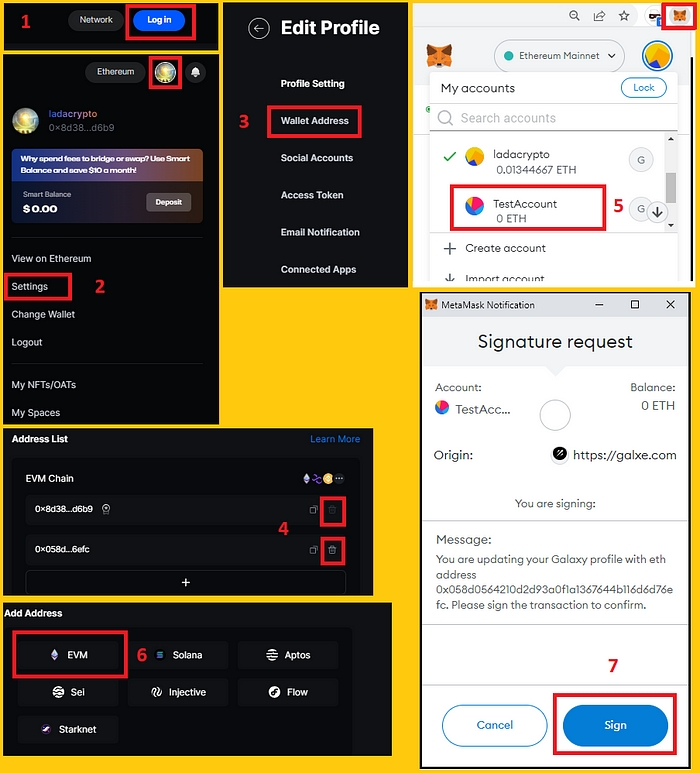
How can I switch my main EVM wallet with Galxe ID?
Switching your main EVM wallet with Galxe ID is a step-by-step process. First, you need to create a Galxe ID account. Then, you need to link your existing EVM wallet to your Galxe ID account. Finally, you can set your newly linked wallet as your main wallet in Galxe ID settings.
Is switching my main EVM wallet with Galxe ID safe?
Yes, switching your main EVM wallet with Galxe ID is safe. Galxe ID uses advanced encryption and security measures to ensure the safety of your funds and personal information. However, it is always recommended to follow best security practices and keep your login credentials secure.
Can I switch back to my previous EVM wallet after switching to Galxe ID?
Yes, you can switch back to your previous EVM wallet after switching to Galxe ID. Galxe ID allows for easy management of multiple wallets, so you can switch between different wallets as per your preference.
What is Galxe ID?
Galxe ID is a decentralized identity management system that allows users to link their digital identities with their Ethereum wallets. It enables users to securely and easily switch their main EVM wallet with Galxe ID.
Why would I want to switch my main EVM wallet with Galxe ID?
Switching your main EVM wallet with Galxe ID can provide you with several benefits. It allows you to have a decentralized identity management system and linked digital identities, which can enhance security and streamline your digital interactions. Additionally, with Galxe ID, you can easily manage multiple wallets and seamlessly switch between them.
2022-2024 @ Switching your main evm wallet with galxe id progress a step by step guide
If you have any questions or need assistance during the switching process, you can visit for more information and support.