If you are looking to remove your primary EVM wallet on Galxe ID, you have come to the right place. Whether you no longer need the wallet or want to switch to a different one, we will guide you through the process step-by-step.
To start, it is important to understand that removing your primary EVM wallet will permanently delete all the associated data, including transaction history and stored funds. Therefore, it is crucial to make sure you have a backup of any important information or funds before proceeding with the removal.
Here is a step-by-step guide on how to remove your primary EVM wallet on Galxe ID:
Step 1: Open the Galxe ID application on your device and log in using your credentials. Make sure you have a stable internet connection.
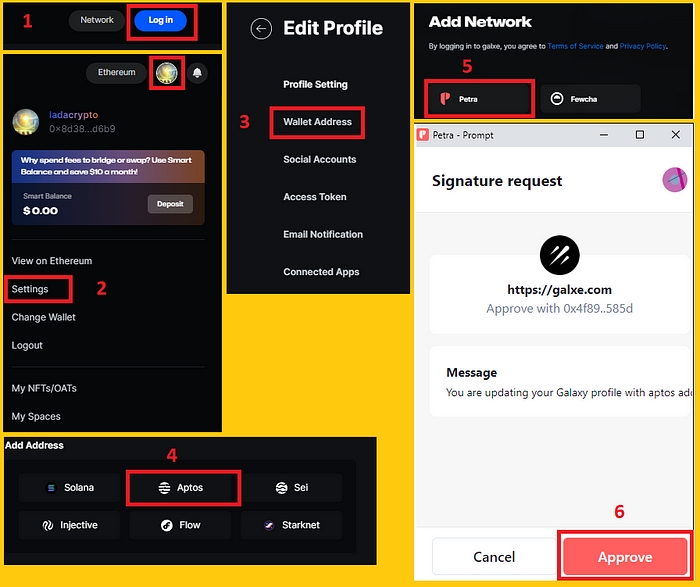
Step 2: Once you are logged in, navigate to the "Wallets" section. This is usually represented by a wallet icon or a similar symbol.
Step 3: In the "Wallets" section, you will see a list of all your saved wallets. Locate the primary EVM wallet you want to remove and select it.
Step 4: Within the selected wallet, look for an option or button that says "Remove" or "Delete." Click on it to initiate the removal process.
Step 5: A confirmation message will appear asking you to confirm the removal. Read the message carefully and double-check that this is indeed the wallet you want to remove. If you are certain, proceed with the removal.
Step 6: After confirming the removal, the wallet and all its associated data will be permanently deleted from your Galxe ID account.
It is worth noting that removing your primary EVM wallet does not affect any other wallets or data associated with your Galxe ID account. You can continue to use the application normally with your remaining wallets, or even add new ones if needed.
In conclusion, removing your primary EVM wallet on Galxe ID is a straightforward process, but it is vital to be cautious and make sure you have a backup of any important data before proceeding. We hope this step-by-step guide has been helpful in assisting you with the removal process.
Removing your primary EVM wallet on Galxe ID is a straightforward process that can be done following these simple steps:
Visit the Galxe ID website and log in to your account using your credentials.
Once you are logged in, navigate to the Dashboard or Wallet section of your Galxe ID account. This is usually found in the main menu or sidebar.
In the Wallet section, locate your primary EVM wallet from the list of available wallets. Click on it to select it.
After selecting your primary EVM wallet, you should see an option to remove or delete it. Click on this option to proceed with the removal process.
A confirmation dialog or prompt will appear asking you to confirm the removal of your primary EVM wallet. Read the information carefully, as this action cannot be undone. If you are sure you want to remove the wallet, proceed with confirming the removal.
After confirming the removal, you will receive a notification or prompt indicating that the removal process is complete. Your primary EVM wallet has now been successfully removed from your Galxe ID account.
Note: Removing your primary EVM wallet will not delete the blockchain data associated with the wallet. If you wish to completely erase all the data and transactions related to the wallet, you may need to take additional steps depending on the blockchain network.
Congratulations! You have now successfully removed your primary EVM wallet on Galxe ID using this step-by-step guide.
If you are looking to remove your primary EVM wallet on Galxe ID, you may need to visit the official Galxe ID website. Galxe ID is a platform that provides secure and convenient Ethereum Virtual Machine (EVM) wallet services.
Galxe ID is a platform that aims to simplify and secure the use of EVM wallets. It provides users with a user-friendly interface to interact with EVM wallets and blockchain applications. With Galxe ID, users can securely store and manage their cryptocurrencies, as well as access various decentralized applications.
1. Visit the Galxe ID website by clicking on the link provided above.
2. Once you are on the website, navigate to the "Wallets" or "My Wallets" section.
3. Look for the option to manage or remove your primary EVM wallet.
4. Follow the instructions provided by the Galxe ID platform to remove your primary EVM wallet.
5. Confirm the removal of your primary EVM wallet, if prompted.
6. Once the removal process is complete, your primary EVM wallet will no longer be associated with your Galxe ID account.
To remove your primary EVM wallet on Galxe ID, you will need to log in to your Galxe ID account. Here are the steps to do so:
Open your web browser and navigate to the Galxe ID website by typing in the URL or searching for it on a search engine.
On the Galxe ID homepage, locate the "Log In" or "Sign In" button and click on it. This will take you to the login page where you will need to enter your login credentials.
If you already have a Galxe ID account, enter your username or email address and your password in the provided fields. Make sure to double-check your entries for accuracy.
If you don't have a Galxe ID account, click on the "Sign Up" or "Register" button to create a new account. Follow the on-screen instructions to complete the registration process and then proceed to log in using your newly created credentials.
After entering your login credentials correctly, click on the "Log In" or "Sign In" button to access your Galxe ID account dashboard. This is where you can manage your wallets, settings, and other account details.
Take a moment to familiarize yourself with the dashboard and locate the section or menu where you can manage your wallets.
Note: The exact location and terminology may vary depending on the Galxe ID website layout or any updates that may have been made. Look for options such as "Wallets," "My Wallets," "Wallet Management," or similar labels.
Once you have accessed the wallet management section, you will be able to proceed with removing your primary EVM wallet from your Galxe ID account.
Remember to exercise caution when making changes to your wallet settings or removing wallets, as it may result in the permanent loss of funds or data. Always ensure that you have appropriate backups and follow the necessary precautions.
Before you can remove your primary EVM wallet on Galxe ID, you need to access your wallet settings. Here's how to do it:
Login to your Galxe ID account.
Navigate to the homepage or dashboard.
Look for the "Settings" option - it is usually represented by a gear or gear-like icon.
Click on the "Settings" option to access your wallet settings.
Once you are in the wallet settings, you will be able to manage various aspects of your wallet, including adding or removing wallets, changing account information, and adjusting security settings. Make sure to proceed with caution and double-check your actions before making any changes to your primary EVM wallet.
To remove your primary EVM wallet on Galxe ID, you first need to locate it. Here are the steps to find your primary EVM wallet:
Go to the Galxe ID website and log in to your account.
Once logged in, navigate to the "Wallet" section of your account.
In the "Wallet" section, you will see a list of all the wallets associated with your Galxe ID.
Look for the wallet marked as your primary EVM wallet. It may be labeled as "Primary" or have a special designation.
If you are unsure which wallet is your primary EVM wallet, check the wallet address or any additional information provided to identify it.
Once you have located your primary EVM wallet, you can proceed with the steps to remove it. Make sure to double-check that you are deleting the correct wallet to avoid any accidental loss of funds or data.
Once you have accessed your primary EVM wallet on Galxe ID, you can easily remove it from your account by following these steps:
First, ensure that you are logged into your Galxe ID account on the platform.
Next, navigate to the "Wallets" section, usually located in the main menu or dashboard.
Look for the primary EVM wallet that you want to remove and click on it to access its details.
In the wallet details screen, you should see an option or button labeled "Remove Wallet" or something similar. Click on it.
A confirmation prompt or dialog box will appear on the screen to confirm the removal of the wallet. Read the message carefully and make sure that you are removing the correct wallet as this action cannot be undone.
If you are certain that you want to remove the wallet, click on the "Confirm" or "Remove" button.
After confirming, the primary EVM wallet will be permanently removed from your Galxe ID account. Any funds or assets associated with the wallet will no longer be accessible.
You may need to refresh or reload the page to see the changes reflected in your account.
It is important to note that removing your primary EVM wallet will result in the loss of any funds or assets stored in that wallet. Therefore, double-check and make sure that you have securely backed up any important data or transferred your funds to another wallet before proceeding with the removal.
Before proceeding with the removal of your primary EVM wallet on Galxe ID, it is important to confirm that this is the action you want to take. Once the wallet is removed, you will no longer have access to the funds and any associated transactions.
To confirm the removal, log in to your Galxe ID account and navigate to the wallet settings. You can usually find this option in the account or profile section.
In the wallet settings, locate the section for managing your wallets. Look for the primary EVM wallet that you want to remove and select it. Make sure you are selecting the correct wallet, as removing the wrong wallet can result in loss of funds.
Once you have selected the primary EVM wallet, look for the option to remove or delete it. Click on this option to proceed. A confirmation prompt will appear to ensure you want to proceed with the removal.
Read the confirmation prompt carefully and verify that you have selected the correct wallet for removal. If you are sure, click on the confirmation button to proceed with the removal.
It is essential to understand that removing your primary EVM wallet cannot be undone, and any funds or transactions associated with it will be permanently lost. Make sure you have backed up any necessary information or data before confirming the removal.
By following these steps, you can confirm the removal of your primary EVM wallet on Galxe ID. It is recommended to double-check all the details before proceeding to avoid any unintended consequences.
Before you can remove your primary EVM wallet on Galxe ID, you may be required to provide additional verification to ensure the security of your account. This step is necessary to prevent unauthorized access and protect your funds.
Follow these steps to provide additional verification:
1. Login to your Galxe ID account using your credentials.
2. Navigate to the settings or account preferences section.
3. Look for the "Security" or "Verification" tab and click on it.
4. You may be prompted to enter a One-Time Password (OTP) sent to your registered email address or phone number. Enter the OTP to proceed.
5. Next, you may need to provide additional documents for verification purposes. This could include a government-issued photo ID, proof of address, or other supporting documents.
6. Scan or take clear photos of the required documents and upload them using the provided options. Make sure the documents are legible and valid.
7. Double-check all the information and documents you have provided to ensure accuracy.
8. Submit the verification request and wait for the review process to be completed.
9. Once your additional verification is successfully processed, you will be notified via email or through your Galxe ID account.
Note: The time required for verification may vary depending on the platform and the volume of requests they receive.
By providing this additional verification, you are taking an extra step to secure your primary EVM wallet and protect your assets from unauthorized access.
After following the steps to remove your primary EVM wallet on Galxe ID, it is important to verify that the removal was successful. Here are the steps to verify the removal:
Log in to your Galxe ID account using your credentials.
Access the EVM wallet section of your account.
Check if the primary EVM wallet is no longer listed or available in the wallet section.
Verify that any associated balances or transactions linked to the primary EVM wallet are no longer visible.
Attempt to send a test transaction from your account to check if the primary EVM wallet is truly removed.
If the test transaction is successful and the primary EVM wallet is not affected, this confirms that the removal was successful.
However, if you encounter any issues or errors, it is recommended to contact Galxe ID support for further assistance.
By following these steps, you can ensure that the primary EVM wallet has been successfully removed from your Galxe ID account. This helps to maintain the security and integrity of your wallet and transactions.
What is a primary EVM wallet on Galxe ID?
A primary EVM wallet on Galxe ID is the main Ethereum Virtual Machine wallet that is linked to your Galxe ID. It allows you to manage your Ethereum-based assets and interact with decentralized applications.
Why would I want to remove my primary EVM wallet on Galxe ID?
There could be several reasons why you would want to remove your primary EVM wallet on Galxe ID. You might want to switch to a different wallet, or you might want to create a new Galxe ID with a different primary wallet. It's also possible that you want to remove the wallet for security reasons.
How can I remove my primary EVM wallet on Galxe ID?
To remove your primary EVM wallet on Galxe ID, you need to go to the Galxe ID settings page. From there, you can select the option to remove your primary wallet. You will need to confirm your decision and provide any necessary authentication, such as a password or biometric verification.
What happens to my assets if I remove my primary EVM wallet on Galxe ID?
If you remove your primary EVM wallet on Galxe ID, your assets will no longer be accessible through that wallet. However, they will still exist on the Ethereum blockchain and you can access them using a different wallet or Galxe ID.
Can I add a new primary EVM wallet after removing the existing one on Galxe ID?
Yes, after removing your existing primary EVM wallet on Galxe ID, you can add a new one. You will need to go through the process of linking the new wallet to your Galxe ID and confirming the ownership of the wallet.
What is Galxe ID primary EVM wallet?
The Galxe ID primary EVM wallet is a wallet that is associated with your Galxe ID account and is used for making transactions and storing cryptocurrencies.
How can I remove my primary EVM wallet on Galxe ID?
To remove your primary EVM wallet on Galxe ID, follow these steps:
Can I have multiple EVM wallets on Galxe ID?
Yes, you can have multiple EVM wallets on Galxe ID. Each wallet will have its unique address and can be used for different purposes.
What happens if I remove my primary EVM wallet on Galxe ID?
If you remove your primary EVM wallet on Galxe ID, you will no longer have access to that wallet and the funds stored in it. Make sure to transfer any funds to another wallet before removing the primary one.
2022-2024 @ How to remove your primary evm wallet on galxe id step by step guide
To find the Galxe ID website, you can simply click on the following link: . This will redirect you to the official website where you can find more information about Galxe ID and its services.