Welcome to our comprehensive tutorial on how to add the Aptos Solana SEI Injective Flow StarkNet wallet to your Galxe ID! If you are new to the exciting world of cryptocurrency and decentralized finance (DeFi), this tutorial will provide you with step-by-step instructions and screenshots to help you seamlessly integrate these wallets into your Galxe ID.
The Aptos Solana SEI Injective Flow StarkNet wallet is a powerful tool that allows you to securely store, manage, and transact with various cryptocurrencies. Galxe ID, on the other hand, is a user-friendly platform that enables you to access and utilize different decentralized applications (dApps) and services in the crypto space. By following this tutorial, you will be able to leverage the functionalities of both wallets and enhance your crypto experience.
This tutorial assumes that you already have a Galxe ID and basic knowledge of cryptocurrency wallets. If you haven't created a Galxe ID yet, please visit their official website and sign up for an account. Additionally, we recommend having a basic understanding of how to interact with dApps and the importance of securely managing your crypto assets. Now, let's get started!
Welcome to this comprehensive tutorial on how to add Aptos Solana SEI Injective Flow Starknet Wallet to Galxe ID. In this tutorial, we will guide you through the step-by-step process of integrating your Aptos Solana SEI Injective Flow Starknet Wallet with Galxe ID, a user-friendly platform for managing your digital assets and identities.
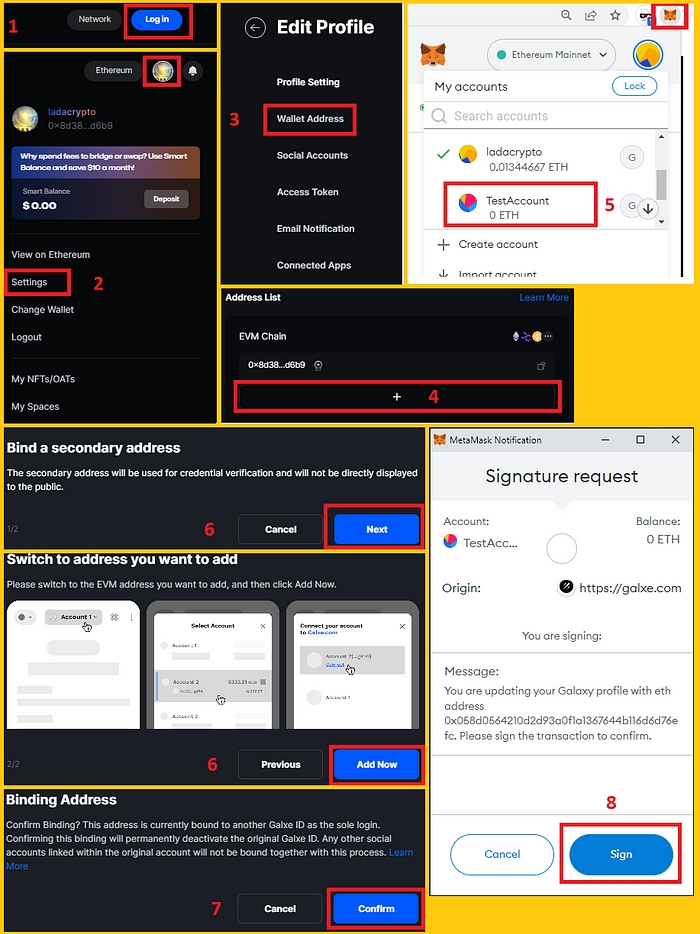
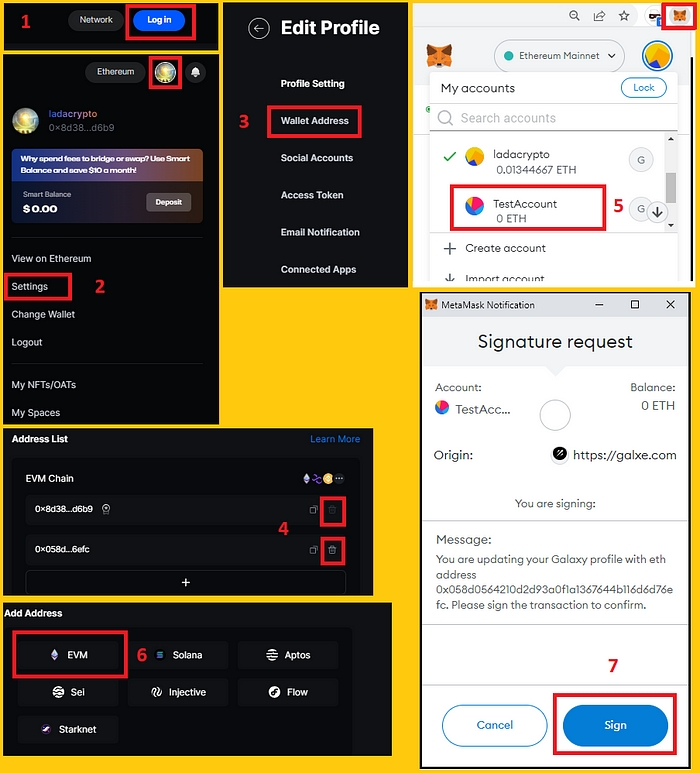
Once you are logged in to your Galxe ID account, locate the "Wallet Integration" section on the dashboard. This section allows you to connect and manage different blockchain wallets within your Galxe ID account.
In the "Wallet Integration" section, click on the "Add Wallet" button to start the integration process.
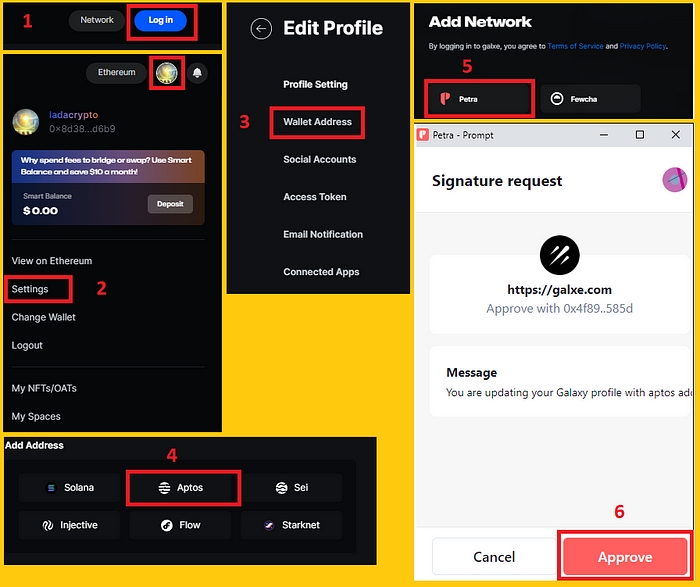
From the list of available wallets, find and select "Aptos Solana SEI Injective Flow Starknet Wallet" as your desired wallet integration.
Once you have selected the wallet integration, carefully follow the on-screen instructions provided by Galxe ID. These instructions will guide you on how to connect your Aptos Solana SEI Injective Flow Starknet Wallet with Galxe ID.
Ensure that you follow each step accurately, as any mistakes may lead to issues with the integration process.
After completing the required steps and following the instructions, you will be prompted to confirm and authenticate the integration between your Aptos Solana SEI Injective Flow Starknet Wallet and Galxe ID.
Review the details and confirm the integration to finalize the process.
Congratulations! You have successfully added your Aptos Solana SEI Injective Flow Starknet Wallet to Galxe ID. You can now manage and access your digital assets seamlessly through Galxe ID's user-friendly interface.
We hope this tutorial has been helpful in guiding you through the process. If you encounter any difficulties or have any further questions, feel free to reach out to Galxe ID's support team for assistance.
Disclaimer: This tutorial is for informational purposes only. Always exercise caution and research thoroughly before integrating wallets or managing your digital assets.
Before you can add Aptos Solana SEI Injective Flow StarkNet Wallet to your Galxe ID profile, you need to follow these steps for preparation and installation:
Make sure you have the latest version of the Aptos Solana SEI Injective Flow StarkNet Wallet application installed on your device. You can download it from the official website of the wallet provider.
Launch the wallet application and go through the initial setup process. This may include creating a new wallet, setting up a password, and generating a recovery phrase. Follow the prompts on the screen to complete the setup.
Once the wallet is set up, make sure you have some SOL (the native cryptocurrency of the Solana network) in your wallet. You can obtain SOL from cryptocurrency exchanges or through other means supported by the wallet.
Ensure that your Galxe ID profile is open on one tab of your web browser, and the Aptos Solana SEI Injective Flow StarkNet Wallet application is open on another tab.
By completing these steps, you will be ready to proceed with adding the Aptos Solana SEI Injective Flow StarkNet Wallet to your Galxe ID profile.
To add Aptos Solana SEI, Injective Flow StarkNet wallet to Galxe ID, you will first need to create a Galxe ID account. Follow the steps below to get started:
Step 1:
Open your preferred web browser and navigate to the Galxe ID website.
Step 2:
Click on the "Sign Up" or "Create Account" button to begin the registration process.
Step 3:
Fill out the required information in the registration form, including your desired username, email address, and password. Make sure to choose a strong password to enhance your account's security.
Step 4:
After filling out the form, click on the "Create Account" or "Register" button to submit your information.
Step 5:
Check your email inbox for a verification email from Galxe ID. Click on the verification link provided in the email to verify your account.
Step 6:
Once your account is verified, you can log in to Galxe ID using your username and password.
Now that you have created a Galxe ID account, you are ready to add Aptos Solana SEI, Injective Flow StarkNet wallet to it and start using it for your transactions and interactions with the supported networks.
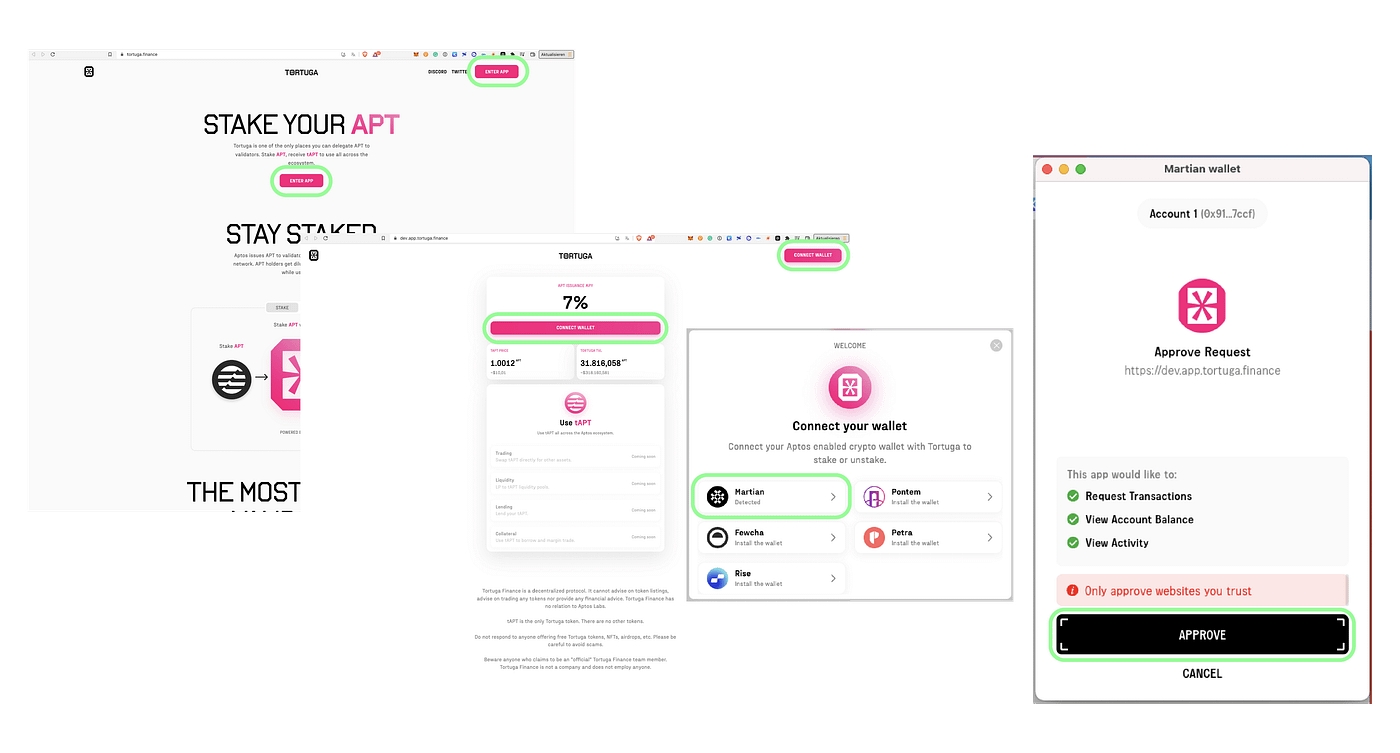
To connect Aptos to Solana, you will need to follow these steps:
Create a Solana Wallet: If you don't already have a Solana wallet, you will need to create one. You can do this by visiting the Solana website and following their wallet creation process.
Install the Aptos Wallet Extension: Once you have your Solana wallet, you will need to install the Aptos Wallet Extension. You can find this extension in the Chrome Web Store.
Connect Aptos to Solana: After installing the Aptos Wallet Extension, open the extension and select the option to connect to Solana. You will be asked to input your Solana wallet address.
Authorize Solana Transactions: Once connected, you will have the ability to authorize Solana transactions using your Aptos wallet. This will allow you to seamlessly interact with various decentralized applications built on Solana.
By following these steps, you will successfully connect Aptos to Solana and gain access to a wide range of decentralized applications and services within the Solana ecosystem.
Before you can start using your APTOS Solana SEI Injective Flow Starknet Wallet on Galxe ID, you need to import it into your Galxe ID account. Follow the steps below to import your wallet:
Open the Galxe ID website and log in to your account.
Once logged in, navigate to the "Wallet" section of your account.
Click on the "Import Wallet" button.
In the import wallet dialog, select the option to import a SEI Injective Flow Starknet Wallet.
Enter the required information, including the wallet address and private key. Make sure to double-check the information for accuracy.
Click on the "Import" button to start the import process.
Wait for the import process to complete. This may take a few moments depending on the network speed.
Once the import process is finished, your SEI Injective Flow Starknet Wallet will be successfully imported into your Galxe ID account.
Now you can start using your SEI Injective Flow Starknet Wallet on Galxe ID to manage your APTOS Solana tokens and access the various features and functionalities offered by the platform.
The integration of Aptos Solana SEI, Injective Flow, StarkNet, and Wallet to Galxe ID provides users with a comprehensive solution for managing decentralized finance (DeFi) assets and transactions. Galxe ID serves as a secure platform for users to authenticate their identities and access various dApps built on the Solana blockchain.
Aptos Solana SEI is a decentralized exchange built on the Solana blockchain. It enables users to trade a wide range of digital assets securely and efficiently. By integrating with Galxe ID, users can seamlessly connect their Aptos Solana SEI accounts to Galxe ID, providing them with a simplified and streamlined experience for managing their assets.
Injective Flow is a protocol that allows users to create, trade, and manage synthetic assets. By integrating with Galxe ID, the Injective Flow protocol becomes accessible to Galxe ID users, enabling them to participate in the creation and trading of synthetic assets on the Injective Flow platform.
StarkNet is a layer 2 scaling solution for the Ethereum blockchain, which allows for faster, more scalable, and lower-cost transactions. By integrating with Galxe ID, users can leverage StarkNet's capabilities to conduct Ethereum transactions with reduced fees and faster confirmation times.
The integration of Wallet to Galxe ID provides users with a convenient and secure way to store their digital assets. Through the Wallet integration, users can manage their funds and perform transactions directly from Galxe ID, eliminating the need for separate wallet applications.
Overall, the integration of Aptos Solana SEI, Injective Flow, StarkNet, and Wallet to Galxe ID offers users a powerful and comprehensive DeFi ecosystem. It simplifies the management of assets, provides access to various DeFi platforms, and enhances the overall user experience in the decentralized finance space.
Galxe ID is a comprehensive platform that provides a way for users to access various decentralized applications (DApps) and interact with different blockchain networks. The Injective Flow Starknet Wallet is one of the wallets that can be used with Galxe ID, allowing users to securely manage their assets and perform transactions.
To begin using the Injective Flow Starknet Wallet with Galxe ID, you first need to install the wallet extension. Here are the steps to follow:
Open your preferred web browser and navigate to the official Injective Protocol website.
Find the "Wallet" section and click on it.
Select the option to download the Injective Flow Starknet Wallet extension.
Follow the installation prompts to add the wallet extension to your browser.
Once you have installed the wallet extension, you can connect it to Galxe ID. Follow these steps to do so:
Open the Galxe ID platform in your web browser.
Login to your Galxe ID account or create a new account if you don't have one.
Once logged in, you should see the option to connect a wallet. Click on it.
A list of supported wallets will appear. Select the Injective Flow Starknet Wallet.
The Injective Flow Starknet Wallet extension will open, and you will be prompted to authorize the connection with Galxe ID. Click "Connect" to proceed.
After successfully connecting the Injective Flow Starknet Wallet to Galxe ID, you can start managing your assets and performing transactions. Here are some key actions you can take:
View Balance
You can view the balance of your assets in the wallet interface, including the amount of each token you hold.
Send Tokens
You can send tokens to other addresses by specifying the recipient address and the amount of tokens you want to send.
Receive Tokens
You can receive tokens by sharing your wallet address with others. They can send tokens directly to your wallet address.
Swap Tokens
You can swap tokens for other tokens using the decentralized exchange feature within the wallet. This allows you to trade assets directly from your wallet without the need for a centralized exchange.
Stake or Unstake
If supported by the network, you may be able to stake or unstake your tokens to participate in governance activities or earn rewards.
By following these steps and utilizing the Injective Flow Starknet Wallet with Galxe ID, you can securely manage your assets and access various decentralized applications powered by the Injective Protocol.
Once you have successfully installed and logged into the Aptos Solana SEI Injective Flow StarkNet Wallet, you will be greeted with the Aptos dashboard. The dashboard is designed to provide you with an intuitive and user-friendly interface to navigate through the various features and functionalities of the wallet.
At the top of the dashboard, you will find the main navigation menu. This menu allows you to access different sections of the wallet, such as your wallet balance, transactions, and settings. Simply click on the respective tab to navigate to the desired section.
Below the navigation menu, you will find a summary of your wallet balance. This summary provides you with an overview of your account's total balance, including the amount of Aptos tokens and other tokens you hold.
On the left-hand side of the dashboard, you will find a sidebar that displays additional options and information. This sidebar includes sections such as "Recent Transactions" and "Asset Balances," allowing you to quickly view and monitor your recent activities and token holdings.
In the main content area of the dashboard, you will find detailed information and options related to the section you have selected from the navigation menu. For example, if you click on the "Transactions" tab, you will be able to view your transaction history and perform various actions related to your transactions.
To keep track of specific tokens or navigate directly to certain sections, you can utilize the search bar located at the top of the dashboard. Simply enter the token name or section you are looking for, and the dashboard will provide you with relevant results.
Additionally, the dashboard provides a range of customizable options and settings. You can access these options by clicking on the "Settings" tab in the navigation menu. Here, you can personalize your wallet preferences, manage security features, and adjust various other settings to tailor the wallet to your needs.
In conclusion, the Aptos dashboard offers a comprehensive and user-friendly interface for managing your Solana SEI Injective Flow StarkNet Wallet. With its easy navigation, detailed information, and customizable options, the dashboard enables you to efficiently and securely handle your assets and transactions.
Main Navigation Menu
Allows you to access different sections of the wallet.
Wallet Balance Summary
Provides an overview of your account's total balance.
Sidebar
Displays additional options and information.
Main Content Area
Displays detailed information and options for the selected section.
Search Bar
Enables you to search for specific tokens or sections.
Settings
Allows you to customize wallet preferences and manage security features.
Once you have set up your aptos solana sei injective flow starknet wallet on your Galxe ID, you can start sending and receiving transactions. Follow the steps below to learn how:
Open your aptos solana sei injective flow starknet wallet on Galxe ID.
Click on the "Send" button to initiate a transaction.
Enter the recipient's address or select it from your address book.
Specify the amount you want to send and select the currency.
Review the transaction details and double-check the recipient's address.
Click on the "Confirm" button to proceed with the transaction.
Enter your wallet passphrase or provide any additional security verification required.
Wait for the transaction to be processed and confirmed on the aptos solana sei injective flow starknet network.
Once the transaction is confirmed, you will receive a notification in your wallet.
To receive transactions, follow these steps:
Share your wallet address with the sender.
The sender should open their aptos solana sei injective flow starknet wallet and click on the "Send" button.
They should enter your wallet address as the recipient's address.
Specify the amount they want to send and select the currency.
Review the transaction details and double-check the recipient's address.
Click on the "Confirm" button to proceed with the transaction.
Once the sender's transaction is confirmed on the aptos solana sei injective flow starknet network, you will receive the funds in your wallet.
Remember to always review and verify the transaction details before confirming any transactions. This will help ensure that you are sending or receiving funds correctly.
In this section, we will explore some advanced features of the Aptos Solana SEI Injective Flow StarkNet Wallet and discuss troubleshooting tips for common issues.
The Aptos Solana SEI Injective Flow StarkNet Wallet allows you to execute multiple transactions in a single batch, improving efficiency and reducing transaction costs. To initiate a batch transaction, navigate to the "Batch" tab and click on the "+ Add Transaction" button. You can then add multiple transactions with different parameters and execute them all at once.
To estimate the gas cost of a transaction before executing it, you can use the "Gas Estimator" feature in the Aptos Solana SEI Injective Flow StarkNet Wallet. Simply enter the transaction details and click on the "Estimate Gas" button. The wallet will provide an estimate of the gas cost based on current network conditions.
The Aptos Solana SEI Injective Flow StarkNet Wallet provides support for multiple blockchains, allowing you to manage your assets across different networks. To switch between chains, go to the "Settings" tab and select the desired blockchain from the dropdown menu. You can then access your assets and perform transactions specific to that chain.
If you encounter any issues while using the Aptos Solana SEI Injective Flow StarkNet Wallet, here are some troubleshooting tips that may help:
Wallet not connecting to network
Check your internet connection and ensure that you have selected the correct network in the settings.
Transaction stuck or pending for a long time
Try increasing the gas fee or canceling and resending the transaction with a higher fee.
Balance not updating
Refresh the wallet page or wait for a few minutes as sometimes it takes time for the balance to update.
Incorrect address entered
Double-check the address you entered and ensure that it is correct. Transactions cannot be reversed, so verify the address before sending any funds.
Private key or seed phrase lost
If you have lost your private key or seed phrase, it may not be possible to recover your funds. It is important to securely backup and store your private key or seed phrase to avoid such situations.
If you are still facing issues or have any other questions, it is recommended to reach out to the Aptos Solana SEI Injective Flow StarkNet Wallet's support team for further assistance.
What is aptos solana sei injective flow starknet wallet?
Aptos Solana SEI Injective Flow Starknet Wallet is a comprehensive tutorial that guides users on how to add the wallet to Galxe ID. It provides step-by-step instructions, along with screenshots, to make the process easy to follow.
Why would I want to add aptos solana sei injective flow starknet wallet to galxe id?
You might want to add Aptos Solana SEI Injective Flow Starknet Wallet to Galxe ID because it allows you to securely store and manage your digital assets. Galxe ID is a popular platform for managing various blockchain-related functionalities, and adding this wallet can enhance your financial and asset management experience.
Are there any benefits of using aptos solana sei injective flow starknet wallet?
Yes, there are several benefits of using Aptos Solana SEI Injective Flow Starknet Wallet. It provides a high level of security for your digital assets, allowing you to securely store, manage, and transact with your cryptocurrencies. Additionally, it offers a user-friendly interface and seamless integration with Galxe ID, making it convenient to use.
Is it difficult to add aptos solana sei injective flow starknet wallet to galxe id?
No, it is not difficult to add Aptos Solana SEI Injective Flow Starknet Wallet to Galxe ID. The comprehensive tutorial provides step-by-step instructions, along with screenshots, to guide you through the process. Even if you are new to blockchain technology or wallets, you should be able to follow the tutorial easily.
Can I use aptos solana sei injective flow starknet wallet with other platforms?
Aptos Solana SEI Injective Flow Starknet Wallet is designed to work with Galxe ID. However, depending on its compatibility and integration options, you may be able to use it with other platforms or wallets as well. It is recommended to check the wallet's documentation or contact the developers for more information on compatibility.
What is Aptos Solana SEI?
Aptos Solana SEI is a decentralized application (dApp) developed on the Solana blockchain. It offers a suite of financial services and tools, including a wallet, that allows users to securely store, send, and receive Solana tokens.
2022-2024 @ Add aptos solana sei injective flow starknet wallet to galxe id a comprehensive tutorial with screenshots
To begin, navigate to and log in to your Galxe ID account using your credentials. If you don't have an account yet, you can sign up for free by clicking on the "Sign Up" button.
Ensure you have a Galxe ID account. If you don't have one, you can create a new account on the website.