If you're using the Galxe wallet and want to connect to a different network, you're in luck! Here's a step-by-step guide on how to add a wallet to a different network on Galxe.
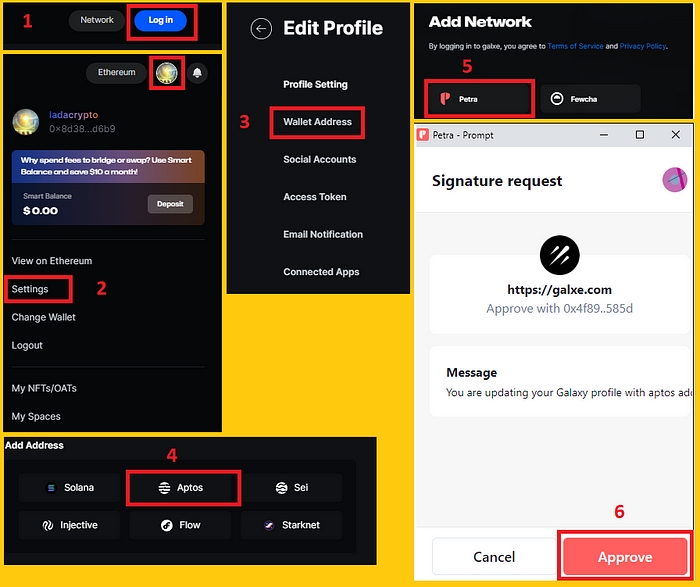
To get started, open the Galxe wallet on your device. Click on the app icon or search for it in your applications folder.
Once the Galxe wallet is open, locate the settings menu. Usually, this can be found by clicking on the three horizontal lines or dots in the top right corner of the app.
In the settings menu, you'll find various options and preferences. Look for the "Network Settings" or similar option and click on it to proceed.
Now, you'll see a list of available networks. Select the network you want to add your wallet to from the list. Make sure you choose a network that is compatible with Galxe.
Finally, you'll need to add your wallet to the selected network. Follow the on-screen instructions and provide any necessary details, such as your wallet address or private key. Once you've completed this step, your Galxe wallet will be connected to the different network.
That's it! You've successfully added your Galxe wallet to a different network. Now you can enjoy using Galxe with a new network and explore all the features and benefits it has to offer. Remember to always exercise caution when connecting your wallet to a different network and double-check the network's compatibility to avoid any potential issues.
The galxe network is a decentralized blockchain network that aims to provide a secure and scalable infrastructure for various applications and services. It utilizes a proof-of-stake consensus algorithm, which allows network participants to validate transactions and create new blocks based on the amount of tokens they hold in their wallets.
In the galxe network, consensus is achieved through a proof-of-stake mechanism known as delegated proof-of-stake (DPoS). This means that instead of all network participants being eligible to create new blocks, a certain number of delegates are elected by the community to perform this task. These delegates are responsible for confirming transactions and maintaining the overall integrity of the network.
Delegates in the galxe network are selected through a voting process, where token holders can vote for their preferred candidates. The number of votes each token holder has is proportional to the number of tokens they hold in their wallets. The delegates with the highest number of votes become active block producers and are responsible for validating transactions and adding them to the blockchain.
The galxe network consists of multiple interconnected nodes that communicate with each other to maintain the network's integrity and consensus. These nodes are responsible for storing a copy of the blockchain and verifying the validity of transactions and blocks. They also participate in the consensus process by voting for delegates and confirming transactions.
The network uses a peer-to-peer (P2P) protocol to ensure seamless communication between nodes. This allows for fast and secure transmission of data, as well as providing redundancy in case of node failures. Each node in the network maintains a copy of the blockchain and verifies the validity of transactions to prevent malicious activities.
Decentralization
Scalability
Security
Consensus efficiency
Efficiency
Network stability
Overall, the galxe network aims to provide a secure, scalable, and decentralized infrastructure for blockchain-powered applications and services. By utilizing the delegated proof-of-stake consensus mechanism and a network of interconnected nodes, it ensures the integrity of transactions and guarantees the overall stability of the network.
When it comes to adding a wallet to a different network on Galxe, it's important to choose the right wallet that suits your needs and preferences. There are several factors to consider when selecting a wallet:
One of the most important aspects of a wallet is its security. You'll want to choose a wallet that employs strong encryption and implements secure practices to protect your funds. Look for wallets that offer features like two-factor authentication, biometric authentication, and support for hardware wallets.
The user experience of a wallet can greatly impact your overall satisfaction and ease of use. Look for wallets that have a clean and intuitive interface, making it easy to navigate and manage your funds. Additionally, consider whether the wallet supports multiple cryptocurrencies and provides convenient features such as transaction history and a built-in exchange.
Having a strong community behind a wallet can be beneficial for both support and future development. Check if the wallet has an active community with regular updates and a responsive support team. A well-supported wallet is more likely to receive regular updates and improvements, ensuring its compatibility with different networks and staying up-to-date with the latest security measures.
Ensure that the wallet you choose is compatible with the specific network you want to add it to. Some wallets may only support certain networks or have limitations in terms of functionality. Before adding a wallet to a different network on Galxe, verify that the wallet is compatible with the network you intend to use.
Security
Excellent
Good
Excellent
User Experience
Great
Good
Excellent
Community Support
Active
Inactive
Active
Compatibility
Network A
Network B
Network A
Adding a wallet to a different network on Galxe is a straightforward process and can be done in a few simple steps:
1. Open the Galxe application on your device and navigate to the wallet settings.
2. Look for the option to add a new wallet and select it.
3. Choose the network you want to add the wallet to from the available options.
4. Enter the necessary information for the wallet, such as the wallet address and any additional details required.
5. Click on the "Add Wallet" button to complete the process.
6. Once the wallet is added, you will be able to access it and use it on the selected network.
Following these steps will allow you to easily add a wallet to a different network on Galxe and manage your funds accordingly.
To add a wallet to a different network on Galaxe, follow these steps:
Launch the Galaxe wallet application on your device.
In the Galaxe wallet interface, locate the menu or settings option. This can usually be found by clicking on the three horizontal lines or the gear icon.
Within the wallet settings, look for the option that allows you to change or select the network. This may be labeled as "Network" or "Network Settings."
Click on the network option and select the desired network to which you want to connect your wallet. This will typically display a list of available networks such as "Mainnet" or "Testnet".
After selecting the desired network, save the changes by clicking on the "Save" or "Apply" button.
Once you have followed these steps, your Galaxe wallet will be connected to the chosen network. You may need to close and reopen the wallet for the changes to take effect.
If you encounter any issues while adding a wallet to a different network on Galxe, here are some common problems and solutions:
1. Incorrect network settings: Make sure that you have entered the correct network details including the network ID, RPC URL, and chain ID. Double-check your settings to ensure that they match the requirements of the network you are trying to connect to.
2. Connectivity issues: If you are unable to connect to the network, check your internet connection and make sure that there are no firewall or network restrictions blocking the connection. You can also try using a different network or device to see if the issue persists.
3. Outdated software: Ensure that you are using the latest version of the Galxe wallet software. Outdated software may have compatibility issues with certain networks or lack necessary features required for adding a wallet to a different network. Check for updates and install them if available.
4. Insufficient funds: If you are unable to add a wallet to a different network due to insufficient funds, make sure that you have enough cryptocurrency in your wallet to cover any transaction fees or network-specific requirements. Add funds to your wallet if necessary.
5. Unsupported network: Some networks may not be supported by the Galxe wallet. Check the list of supported networks to ensure that the network you are trying to add your wallet to is compatible. If the network is not supported, you may need to use a different wallet that supports that specific network.
If you have tried the above troubleshooting steps and are still unable to add a wallet to a different network on Galxe, consider reaching out to the Galxe support team or the community for further assistance.
When adding a wallet to a different network on Galxe, it is important to consider the following security measures:
1. Use trusted sources
Download wallets only from trusted sources, such as official websites or reputable app stores. Be cautious of third-party websites or applications that may contain malicious software.
2. Verify wallet integrity
Before adding a wallet to a different network, verify its integrity by checking the wallet's cryptographic signatures or hashes. This ensures that the wallet has not been tampered with or compromised.
3. Enable two-factor authentication
Enable two-factor authentication (2FA) for your wallet to provide an extra layer of security. This can include using a fingerprint or a unique code sent to your mobile device to verify transactions.
4. Keep software up to date
Regularly update your wallet software to ensure you are using the latest version, which often includes important security patches and bug fixes.
5. Use strong passwords
Create a strong, unique password for your wallet and avoid using the same password for multiple accounts. Consider using a password manager to securely store and generate complex passwords.
6. Be cautious of phishing attempts
Be wary of phishing attempts, where attackers try to trick you into revealing your wallet credentials or sensitive information. Always double-check the URLs of websites and be cautious of suspicious links or emails.
7. Backup your wallet
Regularly create backups of your wallet's private keys or seed phrases. Store these backups in a secure location, away from prying eyes, to ensure you can recover your funds in case of device loss or theft.
8. Use hardware wallets
Consider using a hardware wallet, such as a USB device, for added security. Hardware wallets store your private keys offline, making them less vulnerable to online threats.
By following these security considerations, you can help protect your wallet and funds when adding it to a different network on Galxe.
Keeping your wallet up to date is essential to ensure the security and functionality of your Galxe wallet on a different network. Here are some important steps you can follow:
Regularly check for wallet updates on the official Galxe website or trusted sources. Updates often include security patches, bug fixes, and new features to enhance your wallet's performance.
Before updating your wallet, it is crucial to create a backup of your existing wallet. This backup will help you recover your funds in case anything goes wrong during the update process. Make sure to store the backup in a secure location.
When a new update is available, carefully read and follow the installation instructions provided by Galxe. These instructions will guide you through the update process and ensure that your wallet is successfully connected to the different network.
4. Keep an Eye on Security Measures
Always remain vigilant about the security of your wallet. Enable two-factor authentication if available and use strong, unique passwords. Regularly update your antivirus software and avoid clicking on suspicious links or downloading unknown files.
By following these steps, you can keep your Galxe wallet up to date and protect your funds while using it on a different network. Remember to stay informed about the latest security practices and make sure to keep up with any new updates released by Galxe.
Adding a wallet to a different network on galxe can seem daunting at first, but by following the steps outlined in this guide, you should be able to do it successfully. It is important to double-check all the information before proceeding and to make sure you understand the risks involved.
Remember to always keep your private keys safe and secure. Losing access to your wallet can result in permanent loss of funds, so it's crucial to have backup copies stored in a safe place. Additionally, be cautious when interacting with unknown networks or wallets, as they may be fraudulent or compromised.
By following best practices and staying informed about the latest updates and developments in the galxe network, you can ensure a smooth and secure experience with your wallet.
Can I add a wallet to a different network on Galxe?
Yes, you can add a wallet to a different network on Galxe. Galxe provides a simple and user-friendly interface that allows you to easily connect your wallet to various networks.
What is the process of adding a wallet to a different network on Galxe?
The process of adding a wallet to a different network on Galxe is quite straightforward. First, you need to open your wallet on Galxe. Then, navigate to the settings or preferences section and look for the option to connect to a different network. Click on that option and follow the on-screen instructions to complete the process.
Are there any fees associated with adding a wallet to a different network on Galxe?
Galxe does not charge any fees for adding a wallet to a different network. However, it is important to note that some networks may have their own transaction fees or charges that you may need to pay.
Is it possible to add multiple wallets to different networks on Galxe?
Yes, you can add multiple wallets to different networks on Galxe. Galxe allows you to connect and manage multiple wallets, giving you the flexibility to switch between different networks easily.
What are the benefits of adding a wallet to a different network on Galxe?
Adding a wallet to a different network on Galxe provides several benefits. First, it allows you to access and interact with different blockchain networks and their decentralized applications. Second, it provides you with the opportunity to diversify your cryptocurrency holdings and take advantage of different investment opportunities. Lastly, it offers you more control and flexibility over your digital assets.
Can I add multiple wallets to different networks on galxe?
Yes, you can add multiple wallets to different networks on galxe. Each wallet can be associated with a specific network by following the steps mentioned in the previous answer.
Is it possible to add a wallet to a network that is not listed on galxe?
Yes, it is possible to add a wallet to a network that is not listed on galxe. When adding a new network, you can enter the network details manually, including the RPC URL, chain ID, and other required information. This allows you to connect your wallet to custom or private networks.
Are there any fees for adding a wallet to a different network on galxe?
No, there are no fees for adding a wallet to a different network on galxe. The process of adding a wallet to a new network is free of charge. However, please note that there may be transaction fees associated with using the wallet on the network itself, which are determined by the network's protocols and not galxe.
2022-2024 @ How to add a wallet to a different network on galxe
For a comprehensive overview of Galxe and its features, analytics, and data, visit .